Swap Tokens With The Token Swap Program
Lesson Objectives
By the end of this lesson, you will be able to:
- Create a token swap pool
- Deposit liquidity
- Withdraw liquidity
- Swap tokens
TL;DR
- The Token Swap Program is an SPL contract deployed to Devnet available for testing and experimentation by developers and protocols. For production use cases, use your own deployment or one regularly maintained by a reputable service.
- The program accepts six different instructions, all of which we will explore in this lesson.
- Developers are able to create and use liquidity pools to swap between any SPL token that they wish.
- The program uses a mathematical formula called "curve" to calculate the price of all trades. Curves aim to mimic normal market dynamics: for example, as traders buy a lot of one token type, the value of the other token type goes up.
Overview
Swap Pools
Before we get into how to create and interact with swap pools on Solana, it’s important we understand the basics of what a swap pool is. A swap pool is an aggregation of two different tokens with the purpose of providing liquidity to facilitate exchange between each token.
Users provide liquidity to these pools by depositing their own tokens into each pool. These users are called liquidity providers. When a liquidity provider (or LP) deposits some tokens to the swap pool, LP-tokens are minted that represent the LP's fractional ownership in the pool.
Most swap pools charge a trading fee for facilitating each swap. These fees are then paid out to the LP’s in proportion to the amount of liquidity they are providing in the pool. This provides incentive for LP's to provide liquidity to the pool.
When an LP is ready to withdraw their deposited liquidity, their LP-tokens are burned and tokens from the pool (proportional to the amount of LP-tokens burned) are sent to their wallet.
The purpose of swap pools is to facilitate decentralized trade between users. In traditional finance, users execute trades like this through a centralized exchange on a central limit order book. Generally, this requires a trusted third-party intermediary.
Due to the decentralized nature of cryptocurrency, however, we now have a new way to facilitate trades. Many protocols decentralized exchanges have been built to take advantage of this. Project Serum is an example of such a decentralized central limit order book built on Solana.
Since swap pools are completely decentralized, anybody can issue instructions to the swap program to create a new swap pool between any SPL tokens they wish. This is a massive lift beyond traditional finance. Swap pools and Automated Market Makers (AMMs) are one of DeFi's most fascinating and complex topics. The nitty-gritty details of how they work are outside the scope of this lesson, but there is a ton of material out there available to you if you’re interested in learning more. For example, the Solana Token Swap Program was heavily inspired by Uniswap and Balancer, each of which provide excellent documentation that you can read through.
Token Swap Program and @solana/spl-token-swap
Unlike the Token Program, there is no Solana-maintained deployment of the Token Swap Program. Rather, Solana provides source code for the Token Swap Program as a reference implementation that you can fork and deploy yourself. You can also use a token swap program maintained by a third party organization you trust. Throughout this lesson, we'll be using the deployment maintained by Serum at address SwaPpA9LAaLfeLi3a68M4DjnLqgtticKg6CnyNwgAC8.
Solana also maintains the @solana/spl-token-swap JS library. This library provides helper functions for interacting with a token swap program. Each helper function takes an argument representing a token swap program ID. As long as the program you use accepts the Token Swap instructions, you can use the @solana/spl-token-swap library with it.
Creating a Swap Pool
Creating swap pools with the SPL Token Swap Program really showcases the account, instruction, and authorization models on Solana. This lesson will combine and build on top of a lot of what we have learned so far in the course. For operations specific to the Token Swap Program, we'll use the @solana/spl-token-swap library.
As we talk through creating a swap pool, we'll assume we're creating a swap pool for two tokens named Token A and Token B. Creating the swap pool with the spl-token-swap library is as simple as sending a transaction with an instruction created with the TokenSwap.createInitSwapInstruction function. However, there are a number of accounts you need to create or derive beforehand that will be needed when creating that instruction:
- Token swap state account - holds information about the swap pool
- Swap pool authority - the PDA used to sign transactions on behalf of the swap program
- Token accounts for Token A and Token B - token accounts that will hold tokens A and B for the pool
- Pool token mint - the mint for the swap pool's LP-token
- Pool token account - the token account for the initial minting of the pool token mint when the swap account is created
- Pool token fee account - the account that gets paid the swap pool's trading fees
Token Swap State Account
Before you can create a swap pool, you'll need to create a token swap state account. This account will be used to hold information about the swap pool itself.
To create the token swap state account, you use the SystemProgram instruction createAccount.
1import * as web3 from '@solana/web3' 2import { TokenSwap, TOKEN_SWAP_PROGRAM_ID, TokenSwapLayout } from "@solana/spl-token-swap" 3 4const transaction = new Web3.Transaction() 5const tokenSwapStateAccount = Web3.Keypair.generate() 6const rent = TokenSwap.getMinBalanceRentForExemptTokenSwap(connection) 7const tokenSwapStateAccountInstruction = await Web3.SystemProgram.createAccount({ 8 newAccountPubkey: tokenSwapStateAccount.publicKey, 9 fromPubkey: wallet.publicKey, 10 lamports: rent, 11 space: TokenSwapLayout.span, 12 programId: TOKEN_SWAP_PROGRAM_ID 13}) 14transaction.add(tokenSwapStateAccountInstruction)
A few items to note from this example:
- You can get the number of lamports required for rent exemption using TokenSwap.getMinBalanceRentForExemptTokenSwap from the spl-token-swap library.
- Similarly, you can use TokenSwapLayout.span for the space required on the account.
- programId must be set to TOKEN_SWAP_PROGRAM_ID. This sets the owner of the new account to be the Token Swap Program itself. The Token Swap Program will need to write data to the new account and so must be set as the owner.
Swap Pool Authority
The swap pool authority is the account used to sign for transactions on behalf of the swap program. This account is a Program Derived Address (PDA) derived from the Token Swap Program and the token swap state account.
PDAs can only be created by their owning program, so you don't need to create this account directly. You do, however, need to know its public key. You can discover it using the @solana/web3 library's PublicKey.findProgramAddress function.
1const [swapAuthority, bump] = await Web3.PublicKey.findProgramAddress( 2 [tokenSwapStateAccount.publicKey.toBuffer()], 3 TOKEN_SWAP_PROGRAM_ID, 4)
The resulting public key will be used as the authority on a number of the accounts that follow.
Token accounts for Token A and Token B
Token A and Token B accounts are associated token accounts used for the actual swap pool. These accounts must contain some number of A/B tokens respectively and the swap authority PDA must be marked as the owner of each so that the Token Swap Program can sign for transactions and transfer tokens from each account.
1let tokenAAccountAddress = await token.getAssociatedTokenAddress( 2 tokenAMint, // mint 3 swapAuthority, // owner 4 true // allow owner off curve 5) 6 7const tokenAAccountInstruction = await token.createAssociatedTokenAccountInstruction( 8 wallet.publicKey, // payer 9 tokenAAccountAddress, // ata 10 swapAuthority, // owner 11 tokenAMint // mint 12) 13 14transaction.add(tokenAAccountInstruction)
If you need a refresher on creating token accounts, have a look at the Token Program lesson.
Pool Token Mint
The pool token mint is the mint of the LP-tokens that represent an LP’s ownership in the pool. You create this mint the way you learned in the Token Program lesson. For the swap pool to work, the mint authority must be the swap authority account.
1const poolTokenMint = await token.createMint( 2 connection, 3 wallet, 4 swapAuthority, 5 null, 6 2 7)
Pool Token Account
The pool token account is the account that the initial liquidity pool tokens get minted to when the swap account is first created. Subsequent minting of LP-tokens will be minted directly to the account of the user adding liquidity to the pool. Liquidity pool tokens represent ownership in the deposited liquidity in the pool.
1const tokenAccountPool = Web3.Keypair.generate() 2const rent = await token.getMinimumBalanceForRentExemptAccount(connection) 3const createTokenAccountPoolInstruction = Web3.SystemProgram.createAccount({ 4 fromPubkey: wallet.publicKey, 5 newAccountPubkey: tokenAccountPool.publicKey, 6 space: token.ACCOUNT_SIZE, 7 lamports: rent, 8 programId: token.TOKEN_PROGRAM_ID, 9}) 10const initializeTokenAccountPoolInstruction = token.createInitializeAccountInstruction( 11 tokenAccountPool.publicKey, 12 poolTokenMint, 13 wallet.publicKey 14) 15 16transaction.add(createTokenAccountPoolInstruction) 17transaction.add(initializeTokenAccountPoolInstruction)
Pool Token Fee Account
The pool token fee account is the token account that the fees for the token swaps are paid to. For the Serum deployment of the Token Swap Program that we are using, this account must be owned by a specific account defined in the swap program: HfoTxFR1Tm6kGmWgYWD6J7YHVy1UwqSULUGVLXkJqaKN.
1const feeOwner = new web3.PublicKey('HfoTxFR1Tm6kGmWgYWD6J7YHVy1UwqSULUGVLXkJqaKN') 2 3let tokenFeeAccountAddress = await token.getAssociatedTokenAddress( 4 poolTokenMint, // mint 5 feeOwner, // owner 6 true // allow owner off curve 7) 8 9const tokenFeeAccountInstruction = await token.createAssociatedTokenAccountInstruction( 10 wallet.publicKey, // payer 11 tokenFeeAccountAddress, // ata 12 feeOwner, // owner 13 poolTokenMint // mint 14) 15 16transaction.add(tokenFeeAccountInstruction)
Create the swap pool
With all of the prerequisite accounts created, you can create the swap pool initialization instruction using TokenSwap.createInitSwapInstruction from the spl-token-swap library.
This function takes a lot of arguments. Let's talk through them.
The first 7 arguments are the prerequisite token accounts we just discussed.
After that comes the constant representing the Token Program ID followed by the constant representing the Token Swap Program ID.
Next, there are 4 pairs of number arguments representing numerators and denominators for the trade fee, owner trade fee, owner withdraw fee, and host fee. The instruction uses the numerator and denominator for each to calculate the percentage of the fee. Lets explain each of the fees:
- Trade fee - fees that are retained by the swap pool token accounts during a trade and increase the redeemable value of LP-tokens. This fee rewards users for providing liquidity to the swap pool.
- Owner trade fee - fees that are retained by the swap pool token accounts during a trade, with the equivalent in LP-tokens minted to the owner of the program
- Owner withdraw fee - extra LP-tokens that are sent to the owner on every withdrawal
- Host fee - a proportion of the owner trade fees, sent to an extra host token account provided during the trade. This fee incentives external parties (such as a decentralized exchange) to provide frontends for the swap pool and rewards them with a portion.
When using a swap program deployed and maintained by a third party, these fees may or may not be fixed such that you must input the correct arguments. You'll need to check the implementation of the backing program.
Lastly, there's the curve type, which we'll discuss further later in the lesson.
1const createSwapInstruction = TokenSwap.createInitSwapInstruction( 2 tokenSwapStateAccount, // Token swap state account 3 swapAuthority, // Swap pool authority 4 poolTokenA, // Token A token account 5 poolTokenB, // Token B token account 6 poolTokenMint, // Swap pool token mint 7 tokenFeeAccountAddress, // Token fee account 8 tokenAccountPool.publicKey, // Swap pool token account 9 token.TOKEN_PROGRAM_ID, // Token Program ID 10 TOKEN_SWAP_PROGRAM_ID, // Token Swap Program ID 11 0, // Trade fee numerator 12 10000, // Trade fee denominator 13 5, // Owner trade fee numerator 14 10000, // Owner trade fee denominator 15 0, // Owner withdraw fee numerator 16 0, // Owner withdraw fee denominator 17 20, // Host fee numerator 18 100, // Host fee denominator 19 CurveType.ConstantProduct // Curve type 20) 21 22transaction.add(createSwapInstruction)
When a transaction with these instructions successfully executes, the swap pool is created and ready to be used.
Interacting with Swap Pools
Once the swap pool is initialized, the Token Swap Program has a few different instructions for using a swap pool. These include:
- Executing a swap
- Depositing liquidity
- Withdrawing liquidity
Execute a swap
Users can immediately begin trading on a swap pool using the swap instruction. The swap instruction transfers funds from a user's token account into the swap pool's token account. The swap pool then mints LP-tokens to the user's LP-token account.
Since Solana programs require all accounts to be declared in the instruction, users need to gather all account information from the token swap state account: the token A and B accounts, pool token mint, and fee account.
We swap tokens using the TokenSwap.swapInstruction helper function which requires the following arguments:
- tokenSwap - the token swap state account
- authority - the swap pool authority
- userTransferAuthority - the delegate over the user token account
- userSource - user token account to transfer tokens into the swap
- poolSource - swap pool token account to receive tokens transferred from the user
- poolDestination - swap pool token account to send tokens to the user
- userDestination - user token account to receive tokens sent from the swap pool
- poolMint - the LP-token mint address
- feeAccount - the token account which receives the owner trade fees
- hostFeeAccount - the token account which receives the host trade fees (optional parameter), set to null if none is provided
- swapProgramId - the address of the Token Swap Program
- tokenProgramId - the address of the Token Program
- amountIn - amount of tokens the user wants to transfer to the swap pool
- minimumAmountOut - minimum amount of tokens send to the user token account. This parameter is used to account for slippage. Slippage is the difference between the value of a token when you submit the transaction versus when the order is fulfilled. In this case, the lower the number, the more slippage can possible occur without the transaction failing. Throughout this lesson we'll use 0 for swaps as calculating slippage is outside the scope of this lesson. In a production app, however, it's important to let users specify the amount of slippage they're comfortable with.
The instruction for swapping token A for token B will look like this:
1const swapInstruction = TokenSwap.swapInstruction( 2 tokenSwapStateAccount, 3 swapAuthority, 4 userPublicKey, 5 userTokenA, 6 poolTokenA, 7 poolTokenB, 8 userTokenB, 9 poolMint, 10 feeAccount, 11 null, 12 TOKEN_SWAP_PROGRAM_ID, 13 TOKEN_PROGRAM_ID, 14 amount * 10 ** MintInfoTokenA.decimals, 15 0 16) 17 18transaction.add(swapInstruction)
Deposit liquidity
The Token Swap Program has two variations of deposit instructions. One allows users to only deposit tokens to one side of the swap pool at a time. The other allows for users to deposit to both sides of the swap pool at the same time.
In order to deposit liquidity to both sides of the swap pool, a user’s wallet must have a sufficient amount of each token. When depositing both tokens, instead of providing the amount of each token to deposit, the user specifies the amount of LP-tokens they would like to receive. The Token Swap Program then calculates the amount of each token that a depositor will receive given the pool's curve and current liquidity.
We can deposit both tokens at the same time using the TokenSwap.depositAllTokenTypesInstruction helper function which requires the following arguments:
- tokenSwap - the token swap state account
- authority - the swap pool authority
- userTransferAuthority - the authority over the user token accounts
- sourceA - user token A account to transfer tokens into the swap pool token A account
- sourceB - user token B account to transfer tokens into the swap pool token B account
- intoA - swap pool token account A to receive user's token A
- intoB - swap pool token account B to receive user's token B
- poolToken - the LP-token mint address
- poolAccount - user LP-token account the swap pool mints LP-token to
- swapProgramId - the address of the Token Swap Program
- tokenProgramId - the address of the Token Program
- poolTokenAmount - amount of LP-token the depositor expects to receive
- maximumTokenA - maximum amount of token A allowed to deposit
- maximumTokenB - maximum amount of token A allowed to deposit
The maximumTokenA and maximumTokenB arguments are used to prevent slippage. The higher the number, the more slippage can possibly occur without a transaction failure. For simplicity, we'll use a very large number for these arguments.
The instruction for depositing both token A and token B will look like this:
1const instruction = TokenSwap.depositAllTokenTypesInstruction( 2 tokenSwapStateAccount, 3 swapAuthority, 4 userPublicKey, 5 userTokenA, 6 userTokenB, 7 poolTokenA, 8 poolTokenB, 9 poolMint, 10 userPoolToken, 11 TOKEN_SWAP_PROGRAM_ID, 12 TOKEN_PROGRAM_ID, 13 poolTokenAmount * 10 ** MintInfoPoolToken.decimals, 14 100e9, 15 100e9 16) 17 18transaction.add(instruction)
We can deposit tokens to only one side of the swap pool in a similar way using the TokenSwap.depositSingleTokenTypeExactAmountInInstruction. The main difference is that the last argument in the instruction is minimumPoolTokenAmount. When depositing to only one side of the swap pool, the user specifies exactly how many tokens to deposit. In turn, the Token Swap Program calculates the amount of LP-tokens to mint the user for their deposit. An instruction depositing only Token A will look like this:
1const instruction = TokenSwap.depositSingleTokenTypeExactAmountInInstruction( 2 tokenSwapStateAccount, 3 swapAuthority, 4 userPublicKey, 5 userTokenA, 6 poolTokenA, 7 poolMint, 8 userPoolToken, 9 TOKEN_SWAP_PROGRAM_ID, 10 TOKEN_PROGRAM_ID, 11 DepositAmountTokenA * 10 ** MintInfoTokenA.decimals, 12 0, 13) 14 15transaction.add(instruction)
Withdraw liquidity
In exchange for providing liquidity, depositors receive LP-tokens representing their fractional ownership of all A and B tokens in the pool. At any time, liquidity providers may redeem their LP-token in exchange for tokens A and B at the current "fair" exchange rate as determined by the curve. When liquidity is withdrawn, tokens A and/or B are transferred into the user's token accounts and the user's LP-token are burned.
The Token Swap Program has two variations of withdraw instructions. One allows users to only withdraw tokens from one side of the swap pool at a time. The other allows for withdraws from both sides of the swap pool at the same time.
We can withdraw both tokens at the same time using the TokenSwap.withdrawAllTokenTypesInstruction helper function which requires the following arguements:
- tokenSwap - the token swap state account
- authority - the swap pool authority
- userTransferAuthority - the authority over the user token accounts
- poolMint - the LP-token mint address
- feeAccount - the token account which receives the owner withdraw fees
- sourcePoolAccount - user LP-token account to burn pool tokens LP-token from
- fromA - swap pool token A account to withdraw from
- fromB - swap pool token B account to withdraw from
- userAccountA - user token A account to receive tokens withdrawn from swap pool token A account
- userAccountB - user token B account to receive tokens withdrawn from swap pool token B account
- swapProgramId - the address of the Token Swap Program
- tokenProgramId - the address of the Token Program
- poolTokenAmount - amount of LP-tokens the user expects to burn on withdraw
- minimumTokenA - minimum amount of token A to withdraw
- minimumTokenB - minimum amount of token B to withdraw
The minimumTokenA and minimumTokenB arguments are used to prevent slippage. The lower the number, the more slippage can possibly occur. For simplicity, we will use 0 for these arguments.
The instruction for depositing both token A and token B will look like this:
1const instruction = TokenSwap.withdrawAllTokenTypesInstruction( 2 tokenSwapStateAccount, 3 swapAuthority, 4 userPublicKey, 5 poolMint, 6 feeAccount, 7 userPoolToken, 8 poolTokenA, 9 poolTokenB, 10 userTokenA, 11 userTokenB, 12 TOKEN_SWAP_PROGRAM_ID, 13 TOKEN_PROGRAM_ID, 14 poolTokenAmount * 10 ** MintInfoPoolToken.decimals, 15 0, 16 0 17) 18 19transaction.add(instruction)
We can withdraw tokens from only one side of the swap pool in a similar way using the TokenSwap.withdrawSingleTokenTypeExactAmountOut. The main difference is that the last argument in the instruction is maximumPoolTokenAmount. When withdrawing only one side of the swap pool, the user specifies exact how many tokens to withdraw. In turn, the Token Swap Program calculates the amount of LP-tokens to mint the user must burn. An instruction withdrawing only Token B will look like this:
1const instruction = TokenSwap.depositSingleTokenTypeExactAmountInInstruction( 2 tokenSwapStateAccount, 3 swapAuthority, 4 userPublicKey, 5 poolMint, 6 feeAccount, 7 poolTokenB, 8 userTokenB, 9 TOKEN_SWAP_PROGRAM_ID, 10 TOKEN_PROGRAM_ID, 11 WithdrawAmountTokenB * 10 ** MintInfoTokenB.decimals, 12 100e9, 13) 14 15transaction.add(instruction)
Curves
Trading curves are at the core of how swap pools and AMMs (Automated Market Makers) operate. The trading curve is the function that the Token Swap Program uses to calculate how much of a destination token will be provided given an amount of source token. The curve effectively sets the market price of the tokens in the pool.
The pool we’ll be interacting with in this lesson employs a Constant Product Curve Function. The constant product curve is the well-known Uniswap and Balancer style curve that preserves an invariant on all swaps. This invariant can be expressed as the product of the quantity of token A and token B in the swap pool.
1A_total * B_total = invariant
If we have 100 token A and 5,000 token B, our invariant is 500,000.
Now, if a trader wishes to put in a specific amount token A for some amount of token B, the calculation becomes a matter of resolving "B_out" where:
1(A_total + A_in) * (B_total - B_out) = invariant
Putting in the 10 token A along with our invariant of half a million, we would need to solve for "B_out" like so:
1(100 + 10) * (5,000 - B_out) = 500,000 25,000 - B_out = 500,000 / 110 35,000 - (500,000 / 110) = B_out 4B_out = 454.5454...
The product of the amount of token A and token B must always equal a constant, hence the name ‘Constant Product’. More information can be found on the Uniswap whitepaper and the Balancer whitepaper.
If curves don't make a whole lot of sense, don't worry! While learning more about how they work doesn't hurt, you don't need to understand the entirety of the mathematics to be able to implement the common curves.
Demo
For this demo, a token pool of two brand new tokens has been created and is live on Devnet. We'll walk through building out a frontend UI to interact with this swap pool! Since the pool is already made, we don't have to worry about initiating the pool and funding it with tokens. Instead, we'll focus on building out the instructions for
- depositing liquidity to the pool
- withdrawing your deposited liquidity
- swapping from one token to the other
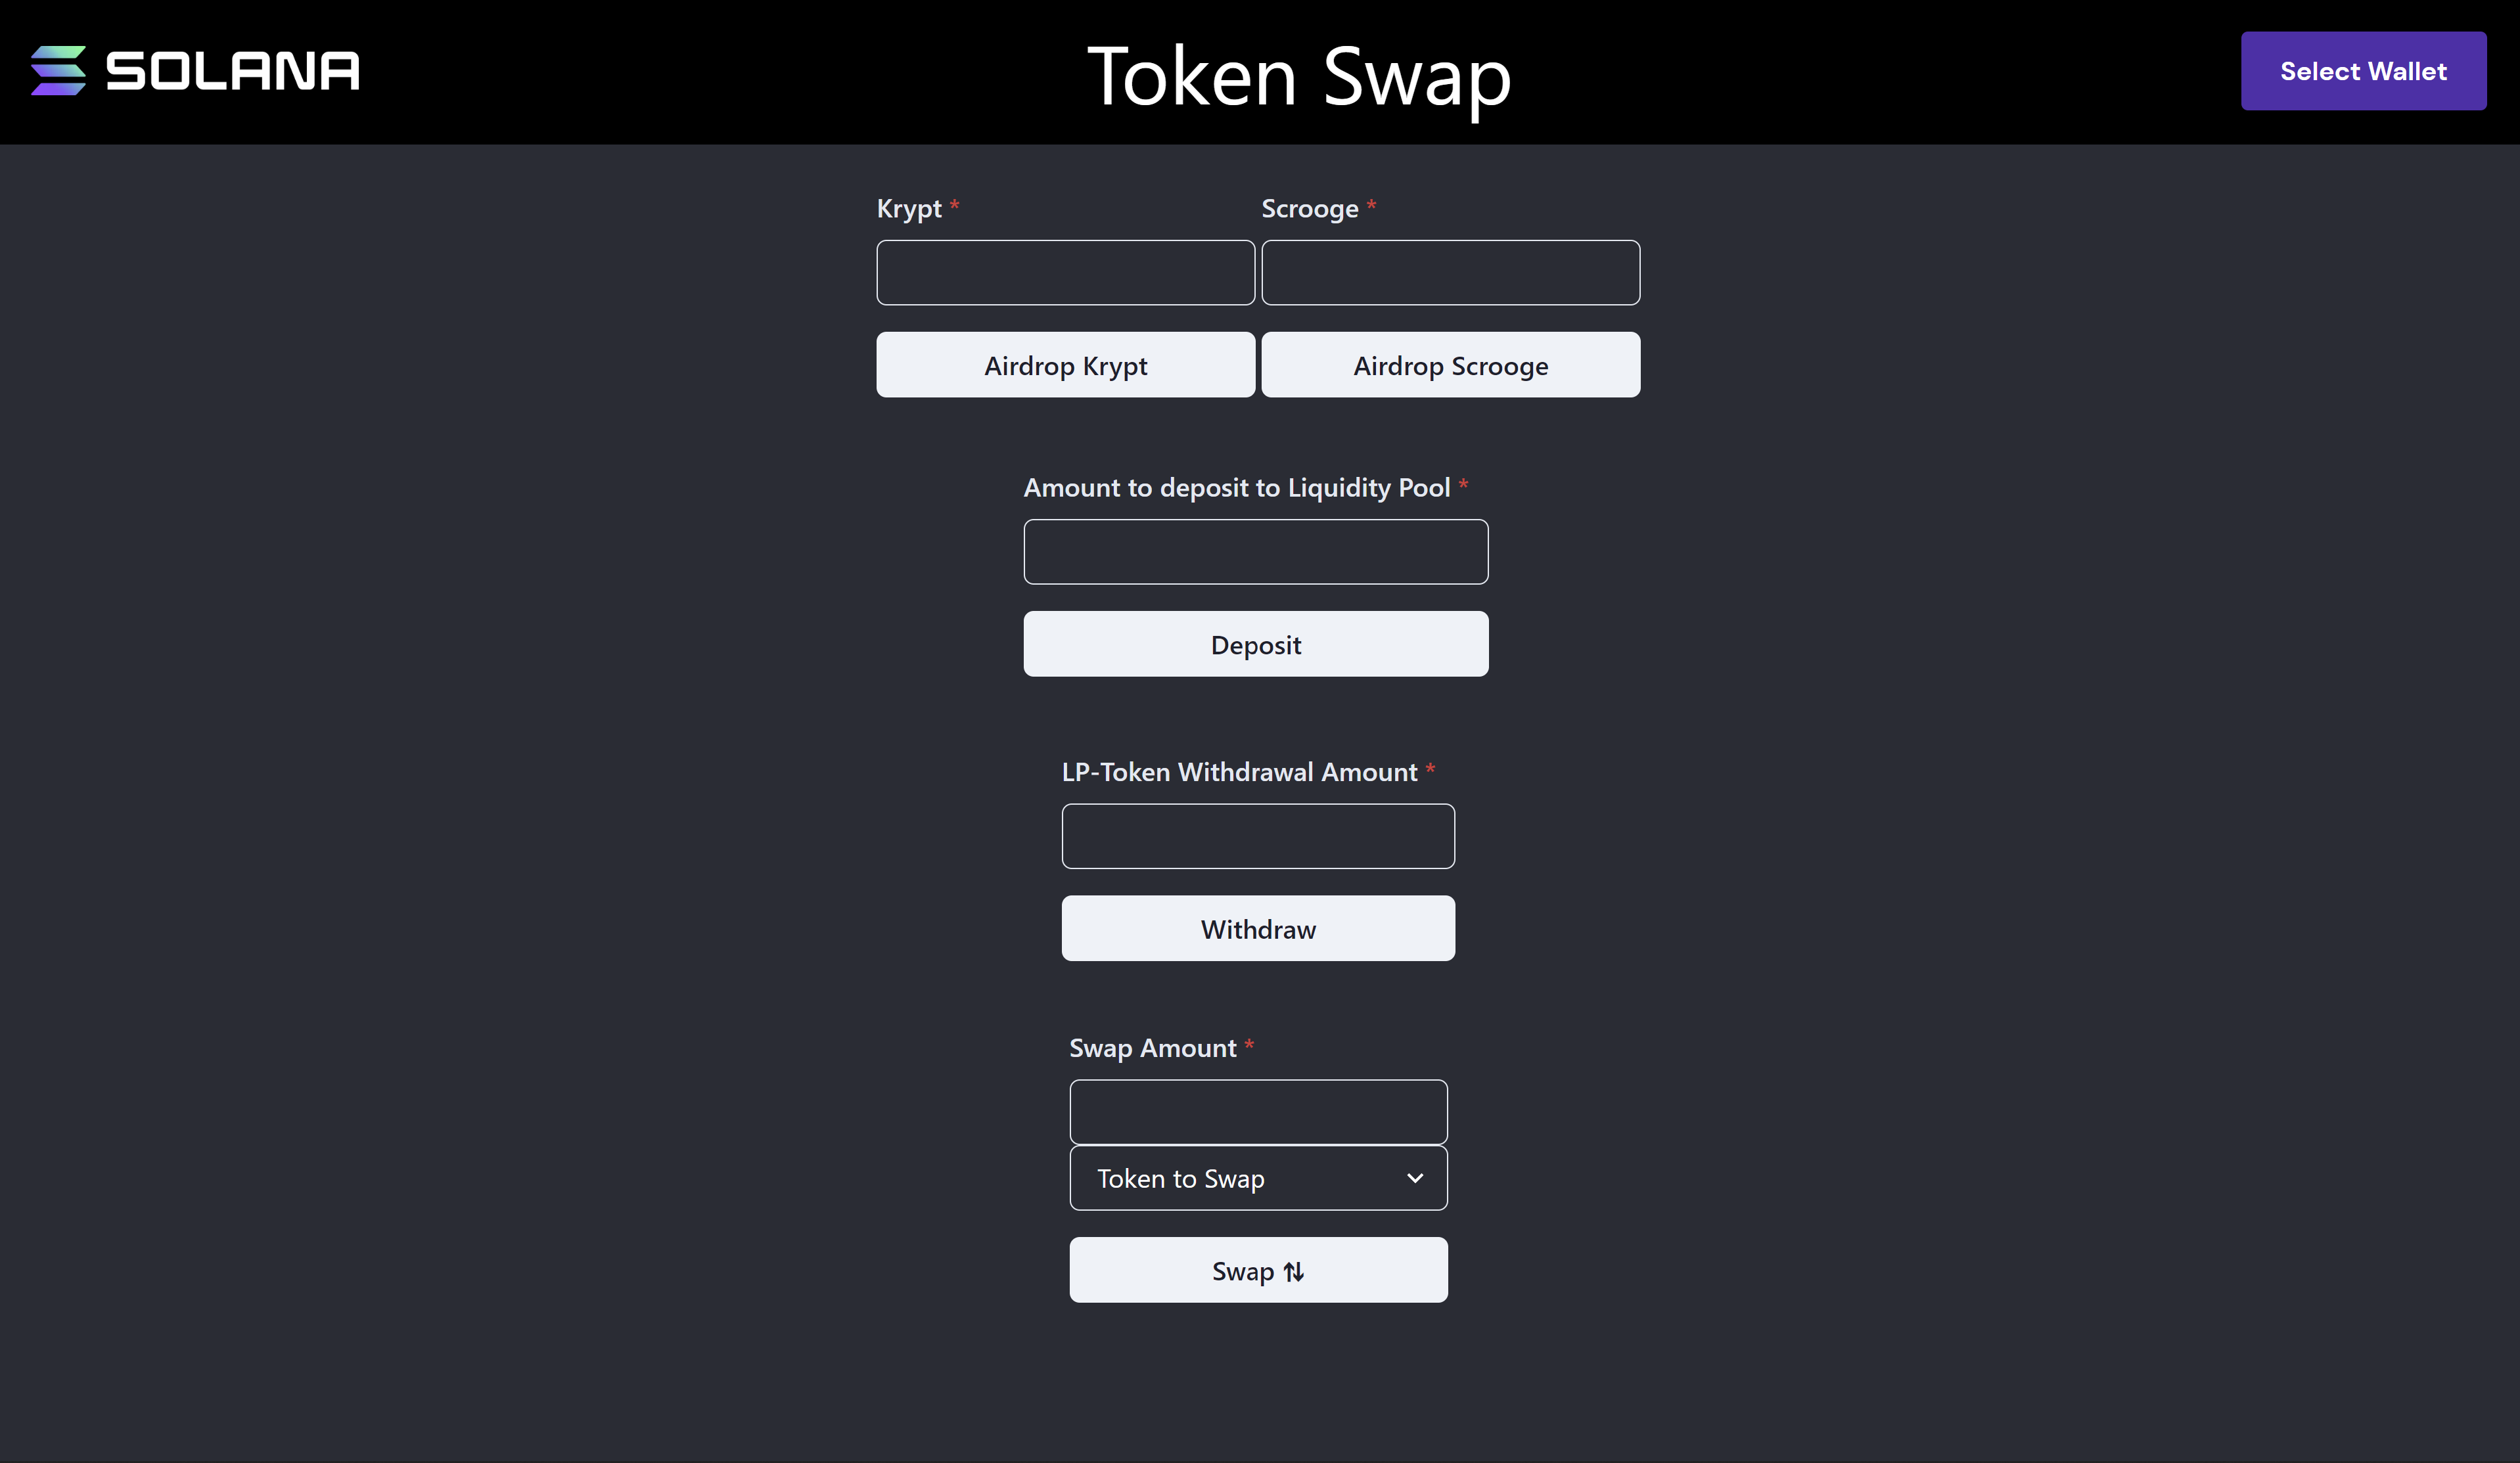
1. Download the starter code
Before we get started, go ahead and download the starter code.
The project is a fairly simple Next.js application re-using a lot of what was previously built out for the demo in the Token Program lesson. As you can see from the image above, there are a few different text inputs and buttons - all of which will submit transactions to the blockchain on the user's behalf. Our focus in this demo will be creating the instructions that the last three buttons will submit.
The airdrop buttons are already implemented and should work out of the box. They utilize an airdrop program that's deployed on Devnet at address CPEV4ibq2VUv7UnNpkzUGL82VRzotbv2dy8vGwRfh3H3. You can mint as many tokens as you'd like to your wallet to interact with the pool.
2. Create the Deposit Instruction
Of the two variations of deposit instructions on the Token Swap Program, we'll be using the variation that provides liquidity to both sides of the swap pool at once: TokenSwap.depositAllTokenTypesInstruction.
The deposit instruction should be added inside the /components/Deposit.tsx file inside the handleTransactionSubmit function. This function is called when the user clicks the Deposit button.
We’ll start by deriving three associated token account addresses:
- The associated token account corresponding to the user's wallet address and Krypt Coin
- The associated token account corresponding to the user's wallet address and Scrooge Coin
- The associated token account corresponding to the user's wallet address and the swap pools LP token
There are a number of ways to do this, but we'll use the helper function getAssociatedTokenAddress from the spl-token library.
We'll also need the data associated with the pool token mint to adjust the user input for the decimals of the pool token. To access a token mint's data, we'll use the helper function getMint from the spl-token library.
1const handleTransactionSubmit = async (deposit: DepositAllSchema) => { 2 if (!publicKey) { 3 alert('Please connect your wallet!') 4 return 5 } 6 // these are the accounts that hold the tokens 7 const kryptATA = await token.getAssociatedTokenAddress(kryptMint, publicKey) 8 const scroogeATA = await token.getAssociatedTokenAddress(ScroogeCoinMint, publicKey) 9 const tokenAccountPool = await token.getAssociatedTokenAddress(pool_mint, publicKey) 10 11 // poolMintInfo holds data we've fetched for the pool token mint 12 const poolMintInfo = await token.getMint(connection, poolMint) 13}
Next, we need to check if the tokenAccountPool address we just derived has been created. We'll use the getAccountInfo function from the @solana/web3 library to get the account info associated with tokenAccountPool. This function will return an AccountInfo struct if the account exists or null otherwise. If null is returned, we'll need to create the account.
Since the handleTransactionSubmit function is already going to be submitting a transaction, we'll simply add the instruction for creating an associated account to the same transaction rather than submit multiple transactions.
1const handleTransactionSubmit = async () => { 2 if (!publicKey) { 3 alert('Please connect your wallet!') 4 return 5 } 6 7 const kryptATA = await token.getAssociatedTokenAddress(kryptMint, publicKey) 8 const scroogeATA = await token.getAssociatedTokenAddress(ScroogeCoinMint, publicKey) 9 const tokenAccountPool = await token.getAssociatedTokenAddress(pool_mint, publicKey) 10 11 const poolMintInfo = await token.getMint(connection, poolMint) 12 13 const transaction = new Web3.Transaction() 14 15 let account = await connection.getAccountInfo(tokenAccountPool) 16 17 if (account == null) { 18 const createATAInstruction = 19 token.createAssociatedTokenAccountInstruction( 20 publicKey, 21 tokenAccountPool, 22 publicKey, 23 pool_mint 24 ) 25 transaction.add(createATAInstruction) 26 } 27}
Finally, we can create the deposit instruction using the spl-token-swap library's TokenSwap.depositAllTokenTypesInstruction helper function. We then add the instruction and submit the transaction.
1const handleTransactionSubmit = async () => { 2 if (!publicKey) { 3 alert("Please connect your wallet!") 4 return 5 } 6 7 const kryptATA = await token.getAssociatedTokenAddress( 8 kryptMint, 9 publicKey 10 ) 11 12 const scroogeATA = await token.getAssociatedTokenAddress( 13 ScroogeCoinMint, 14 publicKey 15 ) 16 17 const tokenAccountPool = await token.getAssociatedTokenAddress( 18 poolMint, 19 publicKey 20 ) 21 22 const poolMintInfo = await token.getMint(connection, poolMint) 23 24 const transaction = new Web3.Transaction() 25 26 let account = await connection.getAccountInfo(tokenAccountPool) 27 28 if (account == null) { 29 const createATAInstruction = 30 token.createAssociatedTokenAccountInstruction( 31 publicKey, 32 tokenAccountPool, 33 publicKey, 34 poolMint 35 ) 36 transaction.add(createATAInstruction) 37 } 38 39 const instruction = TokenSwap.depositAllTokenTypesInstruction( 40 tokenSwapStateAccount, 41 swapAuthority, 42 publicKey, 43 kryptATA, 44 scroogeATA, 45 poolKryptAccount, 46 poolScroogeAccount, 47 poolMint, 48 tokenAccountPool, 49 TOKEN_SWAP_PROGRAM_ID, 50 token.TOKEN_PROGRAM_ID, 51 poolTokenAmount * 10 ** poolMintInfo.decimals, 52 100e9, 53 100e9 54 ) 55 56 transaction.add(instruction) 57 58 try { 59 let txid = await sendTransaction(transaction, connection) 60 alert( 61 `Transaction submitted: https://explorer.solana.com/tx/${txid}?cluster=devnet` 62 ) 63 console.log( 64 `Transaction submitted: https://explorer.solana.com/tx/${txid}?cluster=devnet` 65 ) 66 } catch (e) { 67 console.log(JSON.stringify(e)) 68 alert(JSON.stringify(e)) 69 } 70}
With the exception of the user’s publickey and their derived associated token accounts (for Krypt Coin, Scrooge Coin, and the pool's LP-token), notice that all the accounts are constants for this swap pool and are defined in the const.ts file.
At this point, you should be able to airdrop yourself some tokens and then deposit them into the swap pool!
3. Create the Withdrawal Instruction
The withdrawal instruction is very similar to the deposit instruction, but there are some subtle differences. Like deposits, the Token Swap Program accepts two variations of the withdrawal instruction. You can either withdraw liquidity from a single side of the swap pool, or you can withdraw your deposited liquidity from both sides at the same time.
Of the two variations of withdraw instructions on the Token Swap Program, we'll be using the variation that removes liquidity from both sides of the swap pool at once: TokenSwap.withdrawAllTokenTypesInstruction.
The withdraw instruction should be added inside the /components/Withdraw.tsx file inside the handleTransactionSubmit function. This function is called when the user clicks the Withdraw button.
We’ll start by deriving the three associated token account addresses, fetching the pool token mint data, and checking the tokenAccountPool address the same way we did for the deposit instruction.
1const handleTransactionSubmit = async () => { 2 if (!publicKey) { 3 alert('Please connect your wallet!') 4 return 5 } 6 7 const kryptATA = await token.getAssociatedTokenAddress(kryptMint, publicKey) 8 const scroogeATA = await token.getAssociatedTokenAddress(ScroogeCoinMint, publicKey) 9 const tokenAccountPool = await token.getAssociatedTokenAddress(pool_mint, publicKey) 10 11 const poolMintInfo = await token.getMint(connection, poolMint) 12 13 const transaction = new Web3.Transaction() 14 15 let account = await connection.getAccountInfo(tokenAccountPool) 16 17 if (account == null) { 18 const createATAInstruction = 19 token.createAssociatedTokenAccountInstruction( 20 publicKey, 21 tokenAccountPool, 22 publicKey, 23 pool_mint 24 ) 25 transaction.add(createATAInstruction) 26 } 27}
Next, we create the withdraw instruction using the spl-token-swap library's TokenSwap.withdrawAllTokenTypesInstruction helper function. We then add the instruction and submit the transaction.
1const handleTransactionSubmit = async () => { 2 if (!publicKey) { 3 alert("Please connect your wallet!") 4 return 5 } 6 7 const kryptATA = await token.getAssociatedTokenAddress( 8 kryptMint, 9 publicKey 10 ) 11 const scroogeATA = await token.getAssociatedTokenAddress( 12 ScroogeCoinMint, 13 publicKey 14 ) 15 const tokenAccountPool = await token.getAssociatedTokenAddress( 16 poolMint, 17 publicKey 18 ) 19 20 const poolMintInfo = await token.getMint(connection, poolMint) 21 22 const transaction = new Web3.Transaction() 23 24 let account = await connection.getAccountInfo(tokenAccountPool) 25 26 if (account == null) { 27 const createATAInstruction = 28 token.createAssociatedTokenAccountInstruction( 29 publicKey, 30 tokenAccountPool, 31 publicKey, 32 poolMint 33 ) 34 transaction.add(createATAInstruction) 35 } 36 37 const instruction = TokenSwap.withdrawAllTokenTypesInstruction( 38 tokenSwapStateAccount, 39 swapAuthority, 40 publicKey, 41 poolMint, 42 feeAccount, 43 tokenAccountPool, 44 poolKryptAccount, 45 poolScroogeAccount, 46 kryptATA, 47 scroogeATA, 48 TOKEN_SWAP_PROGRAM_ID, 49 TOKEN_PROGRAM_ID, 50 poolTokenAmount * 10 ** poolMintInfo.decimals, 51 0, 52 0 53 ) 54 55 transaction.add(instruction) 56 try { 57 let txid = await sendTransaction(transaction, connection) 58 alert( 59 `Transaction submitted: https://explorer.solana.com/tx/${txid}?cluster=devnet` 60 ) 61 console.log( 62 `Transaction submitted: https://explorer.solana.com/tx/${txid}?cluster=devnet` 63 ) 64 } catch (e) { 65 console.log(JSON.stringify(e)) 66 alert(JSON.stringify(e)) 67 } 68}
Notice the ordering of accounts is different for the withdraw transaction and there is an additional feeAccount provided this time. This feeAccount is the destination for the fee that must be paid by the user for withdrawing liquidity from the pools.
4. Create the Swap Instruction
Now it's time to implement the actual purpose of this program - the swap instruction!
Note that our UI has a dropdown to allow users to select which token they would like to swap from, so we will have to create our instruction differently based on what the user selects.
We’ll do this inside the handleTransactionSubmit function of the /components/Swap.tsx file. Once again, we will have to derive the user’s Associated Token Addresses for each token mint (Krypt Coin, Scrooge Coin, and Pool Token) and create the tokenAccountPool if it does not already exist. Additionally, we'll fetch the data for both the Krypt Coin and Scrooge Coin to account for the decimal precision of the tokens.
1const handleTransactionSubmit = async () => { 2 if (!publicKey) { 3 alert("Please connect your wallet!") 4 return 5 } 6 7 const kryptMintInfo = await token.getMint(connection, kryptMint) 8 const ScroogeCoinMintInfo = await token.getMint(connection, ScroogeCoinMint) 9 10 const kryptATA = await token.getAssociatedTokenAddress(kryptMint, publicKey) 11 const scroogeATA = await token.getAssociatedTokenAddress(ScroogeCoinMint, publicKey) 12 const tokenAccountPool = await token.getAssociatedTokenAddress(poolMint, publicKey) 13}
From here, the user’s input will determine our path of execution. The user's choice is saved to the mint property, so we'll use this to branch between each possible instruction.
1const handleTransactionSubmit = async () => { 2 if (!publicKey) { 3 alert("Please connect your wallet!") 4 return 5 } 6 7 const kryptMintInfo = await token.getMint(connection, kryptMint) 8 const ScroogeCoinMintInfo = await token.getMint( 9 connection, 10 ScroogeCoinMint 11 ) 12 13 const kryptATA = await token.getAssociatedTokenAddress( 14 kryptMint, 15 publicKey 16 ) 17 const scroogeATA = await token.getAssociatedTokenAddress( 18 ScroogeCoinMint, 19 publicKey 20 ) 21 const tokenAccountPool = await token.getAssociatedTokenAddress( 22 poolMint, 23 publicKey 24 ) 25 26 const transaction = new Web3.Transaction() 27 28 let account = await connection.getAccountInfo(tokenAccountPool) 29 30 if (account == null) { 31 const createATAInstruction = 32 token.createAssociatedTokenAccountInstruction( 33 publicKey, 34 tokenAccountPool, 35 publicKey, 36 poolMint 37 ) 38 transaction.add(createATAInstruction) 39 } 40 41 // check which direction to swap 42 if (mint == "option1") { 43 const instruction = TokenSwap.swapInstruction( 44 tokenSwapStateAccount, 45 swapAuthority, 46 publicKey, 47 kryptATA, 48 poolKryptAccount, 49 poolScroogeAccount, 50 scroogeATA, 51 poolMint, 52 feeAccount, 53 null, 54 TOKEN_SWAP_PROGRAM_ID, 55 TOKEN_PROGRAM_ID, 56 amount * 10 ** kryptMintInfo.decimals, 57 0 58 ) 59 60 transaction.add(instruction) 61 } else if (mint == "option2") { 62 const instruction = TokenSwap.swapInstruction( 63 tokenSwapStateAccount, 64 swapAuthority, 65 publicKey, 66 scroogeATA, 67 poolScroogeAccount, 68 poolKryptAccount, 69 kryptATA, 70 poolMint, 71 feeAccount, 72 null, 73 TOKEN_SWAP_PROGRAM_ID, 74 TOKEN_PROGRAM_ID, 75 amount * 10 ** ScroogeCoinMintInfo.decimals, 76 0 77 ) 78 79 transaction.add(instruction) 80 } 81 82 try { 83 let txid = await sendTransaction(transaction, connection) 84 alert( 85 `Transaction submitted: https://explorer.solana.com/tx/${txid}?cluster=devnet` 86 ) 87 console.log( 88 `Transaction submitted: https://explorer.solana.com/tx/${txid}?cluster=devnet` 89 ) 90 } catch (e) { 91 console.log(JSON.stringify(e)) 92 alert(JSON.stringify(e)) 93 } 94}
And that’s it! Once you have the swap instruction implemented, the UI should be fully functional and you can airdrop yourself tokens, deposit liquidity, withdraw your liquidity, and swap from token to token!
Please take your time with this code and the concepts in this lesson. Swap pools can get a lot more complicated than the one we have implemented today so it's important to understand the basics. If you need some more time with the demo, take it! And if you need, have a look at the solution code here.
Challenge
Now that we've worked through the demo together, try and take it a step further with your own tokens!
In the Token Program lesson you created some tokens. Now make a swap pool for those tokens and modify the code from this lesson's demo to use your tokens and newly created swap pool. There is no solution code for this since it's specific to your tokens, so go slow and take it one step at a time. You've got this!