Create Solana NFTs With Metaplex
Lesson Objectives
By the end of this lesson, you will be able to:
- Explain NFTs and how they're represented on the Solana network
- Explain the role of Metaplex in the Solana NFT ecosystem
- Create and update NFTs using the Metaplex SDK
- Explain the basic functionality of the Token Metadata program, Candy Machine program, and Sugar CLI as tools that assist in creating and distributing NFTs on Solana
TL;DR
- Non-Fungible Tokens (NFTs) are represented on Solana as SPL Tokens with an associated metadata account, 0 decimals, and a maximum supply of 1
- Metaplex offers a collection of tools that simplify the creation and distribution of NFTs on the Solana blockchain
- The Token Metadata program standardizes the process of attaching metadata to SPL Tokens
- The Metaplex SDK is a tool that offers user-friendly APIs to assist developers in utilizing the on-chain tools provided by Metaplex
- The Candy Machine program is an NFT distribution tool used to create and mint NFTs from a collection
- Sugar CLI is a tool that simplifies the process of uploading media/metadata files and creating a Candy Machine for a collection
Overview
Solana Non-Fungible Tokens (NFTs) are SPL tokens created using the Token program. These tokens, however, also have an additional metadata account associated with each token mint. This allows for a wide variety of use cases for tokens. You can effectively tokenize anything, from game inventory to art.
In this lesson, we'll cover the basics of how NFTs are represented on Solana, how to create and update them using the Metaplex SDK, and provide a brief introduction to tools that can assist you in creating and distributing NFTs on Solana at scale.
NFTs on Solana
A Solana NFT is a non-divisible token with associated metadata. Further, the token's mint has a maximum supply of 1.
In other words, an NFT is a standard token from the Token Program but differs from what you might think of as "standard tokens" in that it:
- Has 0 decimals so that it cannot be divided into parts
- Comes from a token mint with supply of 1 so that only 1 of these tokens exists
- Comes from a token mint whose authority is set to null (to ensure that the supply never changes)
- Has an associated account that stores metadata
While the first three points are features that can be achieved with the SPL Token Program, the associated metadata requires some additional functionality.
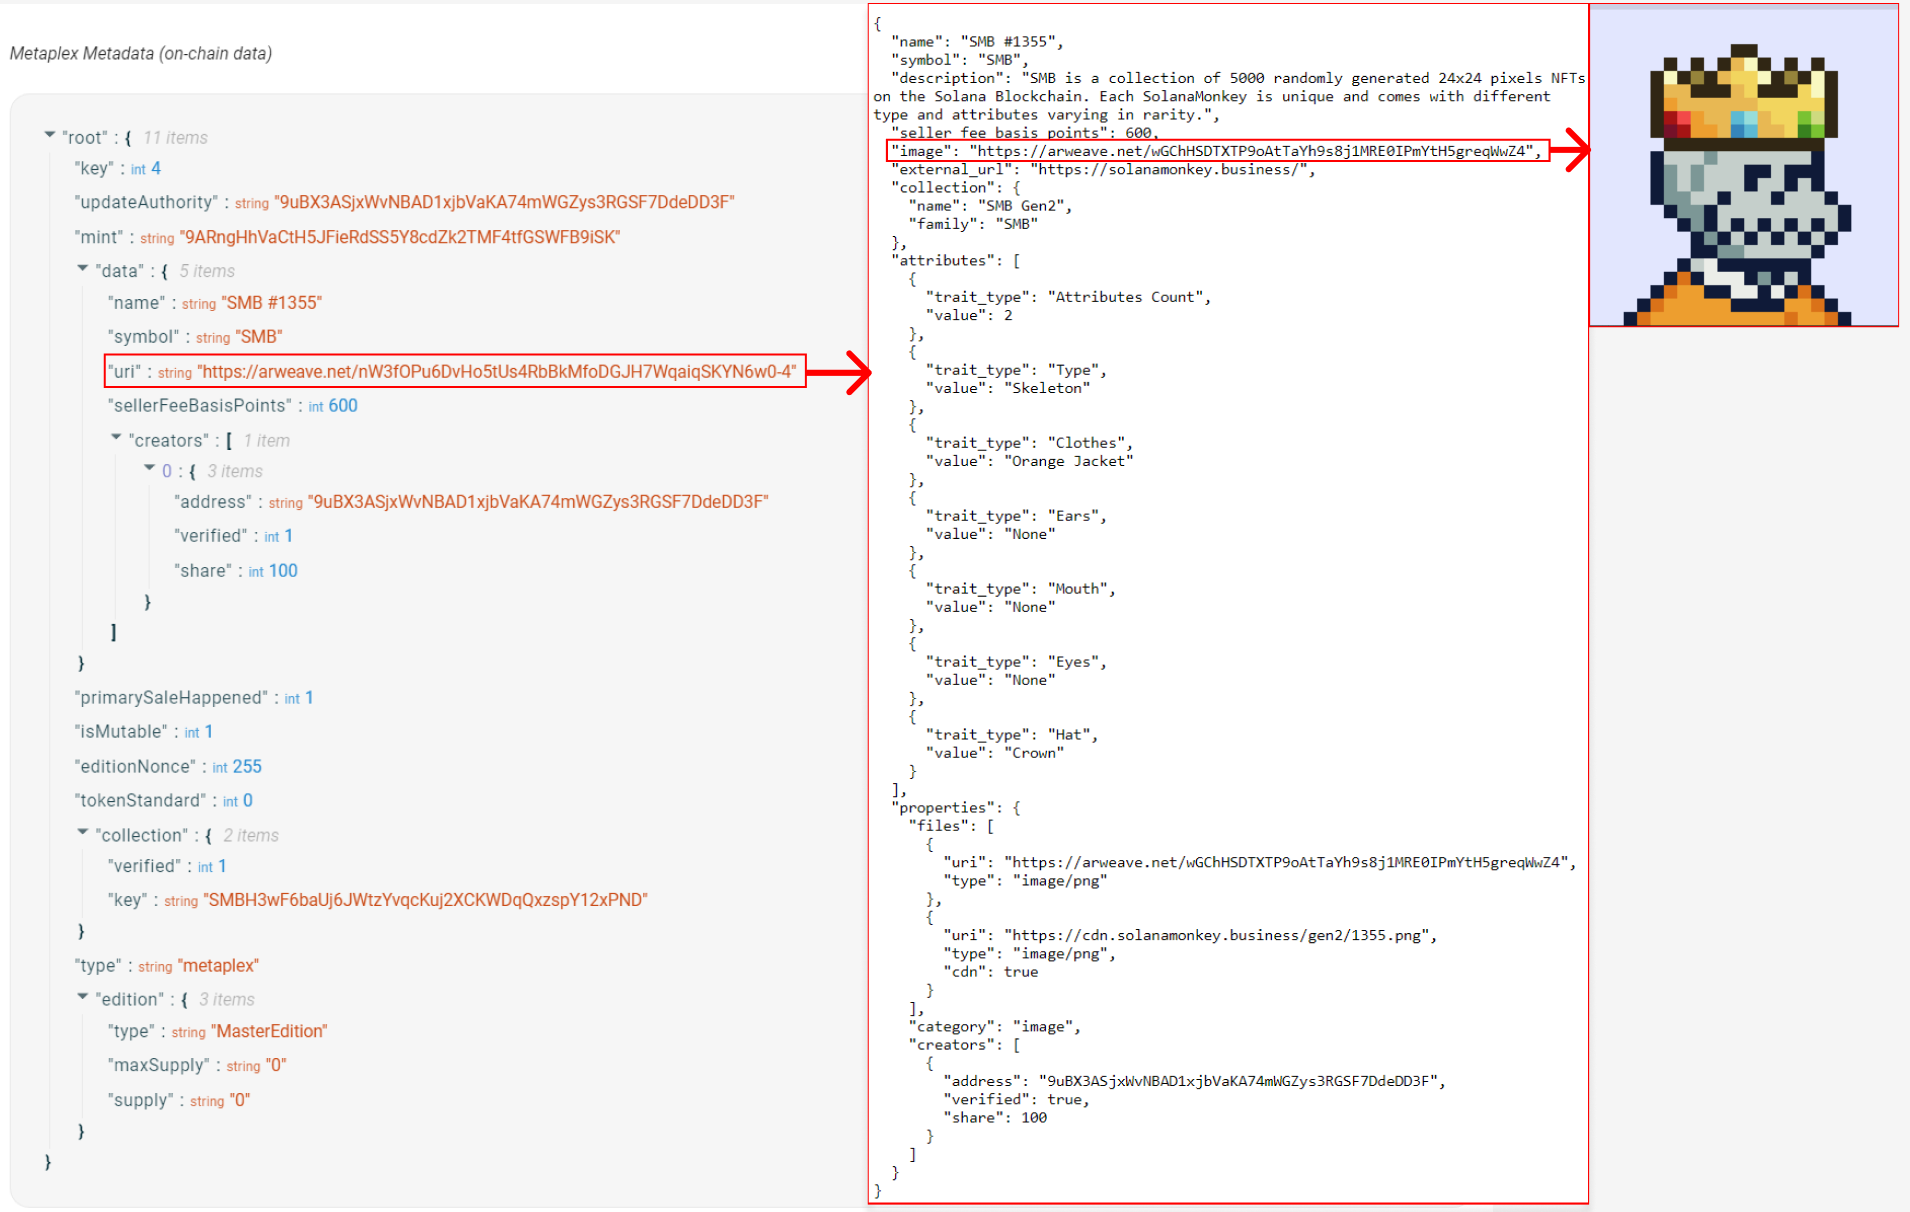
Typically, an NFT’s metadata has both an on-chain and off-chain component. The on-chain metadata is stored in an account associated with the token mint. One of its fields is URI that typically points to an off-chain JSON file (see this link as an example). The off-chain component stores additional data and a link to the image. Permanent data storage systems such as Arweave are often used to store the off-chain component of NFT metadata.
Below is an example of the relationship between on-chain and off-chain metadata. The on-chain metadata contains a URI field that points to an off-chain .json file that stores the link to the image of the NFT and additional metadata.
Metaplex
Metaplex is an organization that provides a suite of tools, like the Metaplex SDK, that simplify the creation and distribution of NFTs on the Solana blockchain. These tools cater to a wide range of use cases and allow you to easily manage the entire NFT process of creating and minting an NFT collection.
More specifically, the Metaplex SDK is designed to assist developers in utilizing the on-chain tools offered by Metaplex. It offers a user-friendly API that focuses on popular use cases and allows for easy integration with third-party plugins. To learn more about the capabilities of the Metaplex SDK, you can refer to the README.
One of the essential programs offered by Metaplex is the Token Metadata program. The Token Metadata program standardizes the process of attaching metadata to SPL Tokens. When creating an NFT with Metaplex, the Token Metadata program creates a metadata account using a Program Derived Address (PDA) with the token mint as a seed. This allows the metadata account for any NFT to be located deterministically using the address of the token mint. To learn more about the Token Metadata program, you can refer to the Metaplex documentation.
In the following sections, we'll cover the basics of using the Metaplex SDK to prepare assets, create NFTs, update NFTs, and associate an NFT with a broader collection.
Metaplex instance
A Metaplex instance serves as the entry point for accessing the Metaplex SDK APIs. This instance accepts a connection used to communicate with the cluster. Additionally, developers can customize the SDK's interactions by specifying an "Identity Driver" and a "Storage Driver".
The Identity Driver is effectively a keypair that can be used to sign transactions, a requirement when creating an NFT. The Storage Driver is used to specify the storage service you want to use for uploading assets. The bundlrStorage driver is the default option and it uploads assets to Arweave, a permanent and decentralized storage service.
Below is an example of how you can set up the Metaplex instance for devnet.
1import { 2 Metaplex, 3 keypairIdentity, 4 bundlrStorage, 5} from "@metaplex-foundation/js"; 6import { Connection, clusterApiUrl, Keypair } from "@solana/web3.js"; 7 8const connection = new Connection(clusterApiUrl("devnet")); 9const wallet = Keypair.generate(); 10 11const metaplex = Metaplex.make(connection) 12 .use(keypairIdentity(wallet)) 13 .use( 14 bundlrStorage({ 15 address: "https://devnet.bundlr.network", 16 providerUrl: "https://api.devnet.solana.com", 17 timeout: 60000, 18 }), 19 );
Upload assets
Before you can create an NFT, you need to prepare and upload any assets you plan to associate with the NFT. While this doesn't have to be an image, most NFTs have an image associated with them.
Preparing and uploading an image involves converting the image to a buffer, converting it to the Metaplex format using the toMetaplexFile function,, and finally uploading it to the designated Storage Driver.
The Metaplex SDK supports the creation of a new Metaplex file from either files present on your local computer or those uploaded by a user through a browser. You can do the former by using fs.readFileSync to read the image file, then convert it into a Metaplex file using toMetaplexFile. Finally, use your Metaplex instance to call storage().upload(file) to upload the file. The function's return value will be the URI where the image was stored.
1const buffer = fs.readFileSync("/path/to/image.png"); 2const file = toMetaplexFile(buffer, "image.png"); 3 4const imageUri = await metaplex.storage().upload(file);
Upload metadata
After uploading an image, it's time to upload the off-chain JSON metadata using the nfts().uploadMetadata function. This will return a URI where the JSON metadata is stored.
Remember, the off-chain portion of the metadata includes things like the image URI as well as additional information like the name and description of the NFT. While you can technically include anything you'd like in this JSON object, in most cases you should follow the NFT standard to ensure compatibility with wallets, programs, and applications.
To create the metadata, use the uploadMetadata method provided by the SDK. This method accepts a metadata object and returns a URI that points to the uploaded metadata.
1const { uri } = await metaplex.nfts().uploadMetadata({ 2 name: "My NFT", 3 description: "My description", 4 image: imageUri, 5});
Create NFT
After uploading the NFT's metadata, you can finally create the NFT on the network. The Metaplex SDK's create method allows you to create a new NFT with minimal configuration. This method will handle the creation of the mint account, token account, metadata account, and the master edition account for you. The data provided to this method will represent the on-chain portion of the NFT metadata. You can explore the SDK to see all the other input that can be optionally provided to this method.
1const { nft } = await metaplex.nfts().create( 2 { 3 uri: uri, 4 name: "My NFT", 5 sellerFeeBasisPoints: 0, 6 }, 7 { commitment: "finalized" }, 8);
This method returns an object containing information about the newly created NFT. By default, the SDK sets the isMutable property to true, allowing for updates to be made to the NFT's metadata. However, you can choose to set isMutable to false, making the NFT's metadata immutable.
Update NFT
If you've left isMutable as true, you may end up having a reason to update your NFT's metadata. The SDK's update method allows you to update both the on-chain and off-chain portions of the NFT's metadata. To update the off-chain metadata, you'll need to repeat the steps of uploading a new image and metadata URI as outlined in the previous steps, then provide the new metadata URI to this method. This will change the URI that the on-chain metadata points to, effectively updating the off-chain metadata as well.
1const nft = await metaplex.nfts().findByMint({ mintAddress }); 2 3const { response } = await metaplex.nfts().update( 4 { 5 nftOrSft: nft, 6 name: "Updated Name", 7 uri: uri, 8 sellerFeeBasisPoints: 100, 9 }, 10 { commitment: "finalized" }, 11);
Note that any fields you don't include in the call to update will stay the same, by design.
Add NFT to Collection
A Certified Collection is a NFT that individual NFT's can belong to. Think of a large NFT collection like Solana Monkey Business. If you look at an individual NFT's Metadata you will see a collection field with a key that point's to the Certified Collection NFT. Simply put, NFTs that are part of a collection are associated with another NFT that represents the collection itself.
In order to add an NFT to a collection, first the Collection NFT has to be created. The process is the same as before, except you'll include one additional field on our NFT Metadata: isCollection. This field tells the token program that this NFT is a Collection NFT.
1const { collectionNft } = await metaplex.nfts().create( 2 { 3 uri: uri, 4 name: "My NFT Collection", 5 sellerFeeBasisPoints: 0, 6 isCollection: true 7 }, 8 { commitment: "finalized" }, 9);
You then list the collection's Mint Address as the reference for the collection field in our new Nft.
1const { nft } = await metaplex.nfts().create( 2 { 3 uri: uri, 4 name: "My NFT", 5 sellerFeeBasisPoints: 0, 6 collection: collectionNft.mintAddress 7 }, 8 { commitment: "finalized" }, 9);
When you checkout the metadata on your newly created NFT, you should now see a collection field like so:
1"collection":{ 2 "verified": false, 3 "key": "SMBH3wF6baUj6JWtzYvqcKuj2XCKWDqQxzspY12xPND" 4}
The last thing you need to do is verify the NFT. This effectively just flips the verified field above to true, but it's incredibly important. This is what lets consuming programs and apps know that your NFT is in fact part of the collection. You can do this using the verifyCollection function:
1await metaplex.nfts().verifyCollection({ 2 mintAddress: nft.address, 3 collectionMintAddress: collectionNft.address, 4 isSizedCollection: true, 5})
Candy Machine
When creating and distributing a bulk supply of NFT's, Metaplex makes it easy with their Candy Machine program and Sugar CLI.
Candy Machine is effectively a minting and distribution program to help launch NFT collections. Sugar is a command line interface that helps you create a candy machine, prepare assets, and create NFTs at scale. The steps covered above for creating an NFT would be incredibly tedious to execute for thousands of NFTs in one go. Candy Machine and Sugar solve this and help ensure a fair launch by offering a number of safeguards.
We won't cover these tools in-depth, but definitely check out how they work together here.
To explore the full range of tools offered by Metaplex, you can view the Metaplex repository on GitHub.
Demo
In this demo, we'll go through the steps to create an NFT using the Metaplex SDK, update the NFT's metadata after the fact, then associate the NFT with a collection. By the end, you will have a basic understanding of how to use the Metaplex SDK interact with NFTs on Solana.
1. Starter
To begin, download the starter code from the starter branch of this repository.
The project contains two images in the src directory that we will be using for the NFTs.
Additionally, in the index.ts file, you will find the following code snippet which includes sample data for the NFT we’ll be creating and updating.
1interface NftData { 2 name: string; 3 symbol: string; 4 description: string; 5 sellerFeeBasisPoints: number; 6 imageFile: string; 7} 8 9interface CollectionNftData { 10 name: string 11 symbol: string 12 description: string 13 sellerFeeBasisPoints: number 14 imageFile: string 15 isCollection: boolean 16 collectionAuthority: Signer 17} 18 19// example data for a new NFT 20const nftData = { 21 name: "Name", 22 symbol: "SYMBOL", 23 description: "Description", 24 sellerFeeBasisPoints: 0, 25 imageFile: "solana.png", 26} 27 28// example data for updating an existing NFT 29const updateNftData = { 30 name: "Update", 31 symbol: "UPDATE", 32 description: "Update Description", 33 sellerFeeBasisPoints: 100, 34 imageFile: "success.png", 35} 36 37async function main() { 38 // create a new connection to the cluster's API 39 const connection = new Connection(clusterApiUrl("devnet")); 40 41 // initialize a keypair for the user 42 const user = await initializeKeypair(connection); 43 44 console.log("PublicKey:", user.publicKey.toBase58()); 45}
To install the necessary dependencies, run npm install in the command line.
Next, execute the code by running npm start. This will create a new keypair, write it to the .env file, and airdrop devnet SOL to the keypair.
1Current balance is 0 2Airdropping 1 SOL... 3New balance is 1 4PublicKey: GdLEz23xEonLtbmXdoWGStMst6C9o3kBhb7nf7A1Fp6F 5Finished successfully
2. Set up Metaplex
Before we start creating and updating NFTs, we need to set up the Metaplex instance. Update the main() function with the following:
1async function main() { 2 // create a new connection to the cluster's API 3 const connection = new Connection(clusterApiUrl("devnet")); 4 5 // initialize a keypair for the user 6 const user = await initializeKeypair(connection); 7 8 console.log("PublicKey:", user.publicKey.toBase58()); 9 10 // metaplex set up 11 const metaplex = Metaplex.make(connection) 12 .use(keypairIdentity(user)) 13 .use( 14 bundlrStorage({ 15 address: "https://devnet.bundlr.network", 16 providerUrl: "https://api.devnet.solana.com", 17 timeout: 60000, 18 }), 19 ); 20}
3. uploadMetadata helper function
Next, lets create a helper function to handle the process of uploading an image and metadata, and returning the metadata URI. This function will take in the Metaplex instance and NFT data as input, and return the metadata URI as output.
1// helper function to upload image and metadata 2async function uploadMetadata( 3 metaplex: Metaplex, 4 nftData: NftData, 5): Promise<string> { 6 // file to buffer 7 const buffer = fs.readFileSync("src/" + nftData.imageFile); 8 9 // buffer to metaplex file 10 const file = toMetaplexFile(buffer, nftData.imageFile); 11 12 // upload image and get image uri 13 const imageUri = await metaplex.storage().upload(file); 14 console.log("image uri:", imageUri); 15 16 // upload metadata and get metadata uri (off chain metadata) 17 const { uri } = await metaplex.nfts().uploadMetadata({ 18 name: nftData.name, 19 symbol: nftData.symbol, 20 description: nftData.description, 21 image: imageUri, 22 }); 23 24 console.log("metadata uri:", uri); 25 return uri; 26}
This function will read an image file, convert it to a buffer, then upload it to get an image URI. It will then upload the NFT metadata, which includes the name, symbol, description, and image URI, and get a metadata URI. This URI is the off-chain metadata. This function will also log the image URI and metadata URI for reference.
5. createNft helper function
Next, let's create a helper function to handle creating the NFT. This function takes in the Metaplex instance, metadata URI and NFT data as inputs. It uses the create method of the SDK to create the NFT, passing in the metadata URI, name, seller fee, and symbol as parameters.
1// helper function create NFT 2async function createNft( 3 metaplex: Metaplex, 4 uri: string, 5 nftData: NftData, 6): Promise<NftWithToken> { 7 const { nft } = await metaplex.nfts().create( 8 { 9 uri: uri, // metadata URI 10 name: nftData.name, 11 sellerFeeBasisPoints: nftData.sellerFeeBasisPoints, 12 symbol: nftData.symbol, 13 }, 14 { commitment: "finalized" }, 15 ); 16 17 console.log( 18 `Token Mint: https://explorer.solana.com/address/${nft.address.toString()}?cluster=devnet`, 19 ); 20 21 return nft; 22}
The function createNft logs the token mint URL and returns the an nft object containing information about the newly created NFT. The NFT will be minted to the public key corresponding to the user used as the Identity Driver when setting up the Metaplex instance.
6. Create NFT
Now that we have set up the Metaplex instance and created helper functions for uploading metadata and creating NFTs, we can test these functions by creating an NFT. In the main() function, call the uploadMetadata function to upload the NFT data and get the URI for the metadata. Then, use the createNft function and metadata URI to create an NFT.
1async function main() { 2 ... 3 4 // upload the NFT data and get the URI for the metadata 5 const uri = await uploadMetadata(metaplex, nftData) 6 7 // create an NFT using the helper function and the URI from the metadata 8 const nft = await createNft(metaplex, uri, nftData) 9}
Run npm start in the command line to execute the main function. You should see output similar to the following:
1Current balance is 1.770520342 2PublicKey: GdLEz23xEonLtbmXdoWGStMst6C9o3kBhb7nf7A1Fp6F 3image uri: https://arweave.net/j5HcSX8qttSgJ_ZDLmbuKA7VGUo7ZLX-xODFU4LFYew 4metadata uri: https://arweave.net/ac5fwNfRckuVMXiQW_EAHc-xKFCv_9zXJ-1caY08GFE 5Token Mint: https://explorer.solana.com/address/QdK4oCUZ1zMroCd4vqndnTH7aPAsr8ApFkVeGYbvsFj?cluster=devnet 6Finished successfully
Feel free to inspect the generated URIs for the image and metadata, as well as view the NFT on the Solana explorer by visiting the URL provided in the output.
7. updateNftUri helper function
Next, let's create a helper function to handle updating an existing NFT's URI. This function will take in the Metaplex instance, metadata URI, and mint address of the NFT. It uses the findByMint method of the SDK to fetch the existing NFT data using the mint address, and then uses the update method to update the metadata with the new URI. Finally, it will log the token mint URL and transaction signature for reference.
1// helper function update NFT 2async function updateNftUri( 3 metaplex: Metaplex, 4 uri: string, 5 mintAddress: PublicKey, 6) { 7 // fetch NFT data using mint address 8 const nft = await metaplex.nfts().findByMint({ mintAddress }); 9 10 // update the NFT metadata 11 const { response } = await metaplex.nfts().update( 12 { 13 nftOrSft: nft, 14 uri: uri, 15 }, 16 { commitment: "finalized" }, 17 ); 18 19 console.log( 20 `Token Mint: https://explorer.solana.com/address/${nft.address.toString()}?cluster=devnet`, 21 ); 22 23 console.log( 24 `Transaction: https://explorer.solana.com/tx/${response.signature}?cluster=devnet`, 25 ); 26}
8. Update NFT
To update an existing NFT, we first need to upload new metadata for the NFT and get the new URI. In the main() function, call the uploadMetadata function again to upload the updated NFT data and get the new URI for the metadata. Then, we can use the updateNftUri helper function, passing in the Metaplex instance, the new URI from the metadata, and the mint address of the NFT. The nft.address is from the output of the createNft function.
1async function main() { 2 ... 3 4 // upload updated NFT data and get the new URI for the metadata 5 const updatedUri = await uploadMetadata(metaplex, updateNftData) 6 7 // update the NFT using the helper function and the new URI from the metadata 8 await updateNftUri(metaplex, updatedUri, nft.address) 9}
Run npm start in the command line to execute the main function. You should see additional output similar to the following:
1... 2Token Mint: https://explorer.solana.com/address/6R9egtNxbzHr5ksnGqGNHXzKuKSgeXAbcrdRUsR1fkRM?cluster=devnet 3Transaction: https://explorer.solana.com/tx/5VkG47iGmECrqD11zbF7psaVqFkA4tz3iZar21cWWbeySd66fTkKg7ni7jiFkLqmeiBM6GzhL1LvNbLh4Jh6ozpU?cluster=devnet 4Finished successfully
You can also view the NFTs in Phantom wallet by importing the PRIVATE_KEY from the .env file.
9. Create an NFT collection
Awesome, you now know how to create a single NFT and update it on the Solana blockchain! But, how do you add it to a collection?
First, let's create a helper function called createCollectionNft. Note that it's very similar to createNft, but ensures that isCollection is set to true and that the data matches the requirements for a collection.
1async function createCollectionNft( 2 metaplex: Metaplex, 3 uri: string, 4 data: CollectionNftData 5): Promise<NftWithToken> { 6 const { nft } = await metaplex.nfts().create( 7 { 8 uri: uri, 9 name: data.name, 10 sellerFeeBasisPoints: data.sellerFeeBasisPoints, 11 symbol: data.symbol, 12 isCollection: true, 13 }, 14 { commitment: "finalized" } 15 ) 16 17 console.log( 18 `Collection Mint: https://explorer.solana.com/address/${nft.address.toString()}?cluster=devnet` 19 ) 20 21 return nft 22}
Next, we need to create the off-chain data for the collection. In main before the existing calls to createNft, add the following collectionNftData:
1const collectionNftData = { 2 name: "TestCollectionNFT", 3 symbol: "TEST", 4 description: "Test Description Collection", 5 sellerFeeBasisPoints: 100, 6 imageFile: "success.png", 7 isCollection: true, 8 collectionAuthority: user, 9}
Now, let's call uploadMetadata with the collectionNftData and then call createCollectionNft. Again, do this before the code that creates an NFT.
1async function main() { 2 ... 3 4 // upload data for the collection NFT and get the URI for the metadata 5 const collectionUri = await uploadMetadata(metaplex, collectionNftData) 6 7 // create a collection NFT using the helper function and the URI from the metadata 8 const collectionNft = await createCollectionNft( 9 metaplex, 10 collectionUri, 11 collectionNftData 12 ) 13}
This will return our collection's mint address so we can use it to assign NFTs to the collection.
10. Assign an NFT to a collection
Now that we have a collection, let's change our existing code so that newly created NFTs get added to the collection. First, let's modify our createNft function so that the call to nfts().create includes the collection field. Then, add code that calls verifyCollection to make it so the verified field in the on-chain metadata is set to true. This is how consuming programs and apps can know for sure that the NFT in fact belongs to the collection.
1async function createNft( 2 metaplex: Metaplex, 3 uri: string, 4 nftData: NftData 5): Promise<NftWithToken> { 6 const { nft } = await metaplex.nfts().create( 7 { 8 uri: uri, // metadata URI 9 name: nftData.name, 10 sellerFeeBasisPoints: nftData.sellerFeeBasisPoints, 11 symbol: nftData.symbol, 12 }, 13 { commitment: "finalized" } 14 ) 15 16 console.log( 17 `Token Mint: https://explorer.solana.com/address/${nft.address.toString()}? cluster=devnet` 18 ) 19 20 //this is what verifies our collection as a Certified Collection 21 await metaplex.nfts().verifyCollection({ 22 mintAddress: nft.mint.address, 23 collectionMintAddress: collectionMint, 24 isSizedCollection: true, 25 }) 26 27 return nft 28}
Now, run npm start and voila! If you follow the new nft link and look at the Metadata tab you will see a collection field with your collection's mint address listed.
Congratulations! You've successfully learned how to use the Metaplex SDK to create, update, and verify NFTs as part of a collection. That's everything you need to build out your own collection for just about any use case. You could build a TicketMaster competitor, revamp Costco's Membership Program, or even digitize your school's Student ID system. The possibilities are endless!
If you want to take a look at the final solution code you can find it on the solution branch of the same repository.
Challenge
To deepen your understanding of the Metaplex tools, dive into the Metaplex documentation and familiarize yourself with the various programs and tools offered by Metaplex. For instance, you can delve into learning about the Candy Machine program to understand its functionality.
Once you have an understanding of how the the Candy Machine program works, put your knowledge to the test by using the Sugar CLI to create a Candy Machine for your own collection. This hands-on experience will not only reinforce your understanding of the tools, but also boost your confidence in your ability to use them effectively in the future.
Have some fun with this! This will be your first independently created NFT collection! With this, you'll complete Module 2. Hope you're feeling the process! Feel free to share some quick feedback here so that we can continue to improve the course!