Write Data To The Solana Network
Lesson Objectives
By the end of this lesson, you will be able to:
- Explain keypair
- Use @solana/web3.js to generate a keypair
- Use @solana/web3.js to create a keypair using a secret key
- Explain transactions
- Explain transaction fees
- Use @solana/web3.js to send sol
- Use @solana/web3.js to sign transactions
- Use Solana explorer to view transactions
TL;DR
- Keypair refers to a pairing of public and secret keys. The public key is used as an “address” that points to an account on the Solana network. The secret key is used to verify identity or authority. As the name suggests, you should always keep secret keys private. @solana/web3.js provides helper functions for creating a brand new keypair, or for constructing a keypair using an existing secret key.
- Transactions are effectively a bundle of instructions that invoke Solana programs. The result of each transaction depends on the program being called. All modifications to on-chain data happen through transactions. Example:
1const transaction = new Transaction() 2 3const sendSolInstruction = SystemProgram.transfer({ 4 fromPubkey: sender, 5 toPubkey: recipient, 6 lamports: LAMPORTS_PER_SOL * amount 7}) 8 9transaction.add(sendSolInstruction) 10 11const signature = sendAndConfirmTransaction( 12 connection, 13 transaction, 14 [senderKeypair] 15)
Overview
Keypair
As the name suggests, a keypair is a pair of keys: a public key and a secret key.
- The public key is used as an “address” that points to an account on the Solana network.
- The secret key is used to verify identity or authority. As the name suggests, you should always keep secret keys private.
A keypair is required for the vast majority of interactions within the Solana network. If you don’t already have a keypair, or if you want to generate a new one for a specific purpose, @solana/web3.js provides a helper function for creating a brand new keypair.
1const ownerKeypair = Keypair.generate()
A keypair is of the data type Keypair and can be deconstructed into a public key:
1const publicKey = ownerKeypair.publicKey
... or the secret key:
1const secretKey = ownerKeypair.secretKey
If you already have a keypair you’d like to use, you can create a Keypair from the secret key using the Keypair.fromSecretKey() function. To ensure that your secret key stays secure, we recommend injecting it through an environment variable and not committing your .env file.
1const secret = JSON.parse(process.env.PRIVATE_KEY ?? "") as number[] 2const secretKey = Uint8Array.from(secret) 3const keypairFromSecretKey = Keypair.fromSecretKey(secretKey)
Transactions
Any modification to on-chain data happens through transactions sent to programs.
Transaction instructions contain:
- an identifier of the program you intend to invoke
- an array of accounts that will be read from and/or written to
- data structured as a byte array that is specified to the program being invoked
When you send a transaction to a Solana cluster, a Solana program is invoked with the instructions included in the transaction.
As you might expect, @solana/web3.js provides helper functions for creating transactions and instructions. You can create a new transaction with the constructor, new Transaction(). Once created, then you can add instructions to the transaction with the add() method.
Instructions can get complicated when working with custom programs. Fortunately, @solana/web3.js has convenience functions for some of Solana’s native programs and basic operations, like transferring SOL:
1const transaction = new Transaction() 2 3const sendSolInstruction = SystemProgram.transfer({ 4 fromPubkey: sender, 5 toPubkey: recipient, 6 lamports: LAMPORTS_PER_SOL * amount 7}) 8 9transaction.add(sendSolInstruction)
The SystemProgram.transfer() function requires that you pass as parameters:
- a public key corresponding to the sender account
- a public key corresponding to the recipient account
- the amount of SOL to send in lamports.
This function then returns the instruction for sending SOL from the sender to the recipient, after which the instruction can be added to the transaction.
Once created, a transaction needs to be sent to the cluster and confirmed:
1const signature = sendAndConfirmTransaction( 2 connection, 3 transaction, 4 [senderKeypair] 5)
The sendAndConfirmTransaction() functions takes as parameters
- a cluster connection
- a transaction
- an array of keypairs that will act as signers on the transaction - in this example, we only have the one signer: the sender.
Instructions
The example of sending SOL is great for introducing you to sending transactions, but a lot of web3 development will involve calling non-native programs. In the example above, the SystemProgram.transfer() function ensures that you pass all the necessary data required to create the instruction, then it creates the instruction for you. When working with non-native programs, however, you’ll need to be very specific about creating instructions that are structured to match the corresponding program.
With @solana/web3.js, you can create non-native instructions with the TransactionInstruction constructor. This constructor takes a single argument of the data type TransactionInstructionCtorFields.
1export type TransactionInstructionCtorFields = { 2 keys: Array<AccountMeta>; 3 programId: PublicKey; 4 data?: Buffer; 5};
Per the definition above, the object passed to the TransactionInstruction constructor requires:
- an array of keys of type AccountMeta
- the public key for the program being called
- an optional Buffer containing data to pass to the program.
We’ll be ignoring the data field for now and will revisit it in a future lesson.
The programId field is fairly self explanatory: it’s the public key associated with the program. You’ll need to know this in advance of calling the program in the same way that you’d need to know the public key of someone to whom you want to send SOL.
The keys array requires a bit more explanation. Each object in this array represents an account that will be read from or written to during a transaction's execution. This means you need to know the behavior of the program you are calling and ensure that you provide all of the necessary accounts in the array.
Each object in the keys array must include the following:
- pubkey - the public key of the account
- isSigner - a boolean representing whether or not the account is a signer on the transaction
- isWritable - a boolean representing whether or not the account is written to during the transaction's execution
Putting this all together, we might end up with something like the following:
1async function callProgram( 2 connection: web3.Connection, 3 payer: web3.Keypair, 4 programId: web3.PublicKey, 5 programDataAccount: web3.PublicKey 6) { 7 const instruction = new web3.TransactionInstruction({ 8 keys: [ 9 { 10 pubkey: programDataAccount, 11 isSigner: false, 12 isWritable: true 13 }, 14 ], 15 programId 16 }) 17 18 const signature = await web3.sendAndConfirmTransaction( 19 connection, 20 new web3.Transaction().add(instruction), 21 [payer] 22 ) 23 24 console.log(signature) 25}
Transaction Fees
Transaction fees are built into the Solana economy as compensation to the validator network for the CPU and GPU resources required in processing transactions. Unlike many networks that have a fee market where users can pay higher fees to increase their chances of being included in the next block, Solana transaction fees are deterministic.
The first signer included in the array of signers on a transaction is responsible for paying the transaction fee. If this signer does not have enough SOL in their account to cover the transaction fee the transaction will be dropped.
When testing, whether locally or on devnet, you can use the Solana CLI command solana airdrop 1 to get free test SOL in your account for paying transaction fees.
Solana Explorer
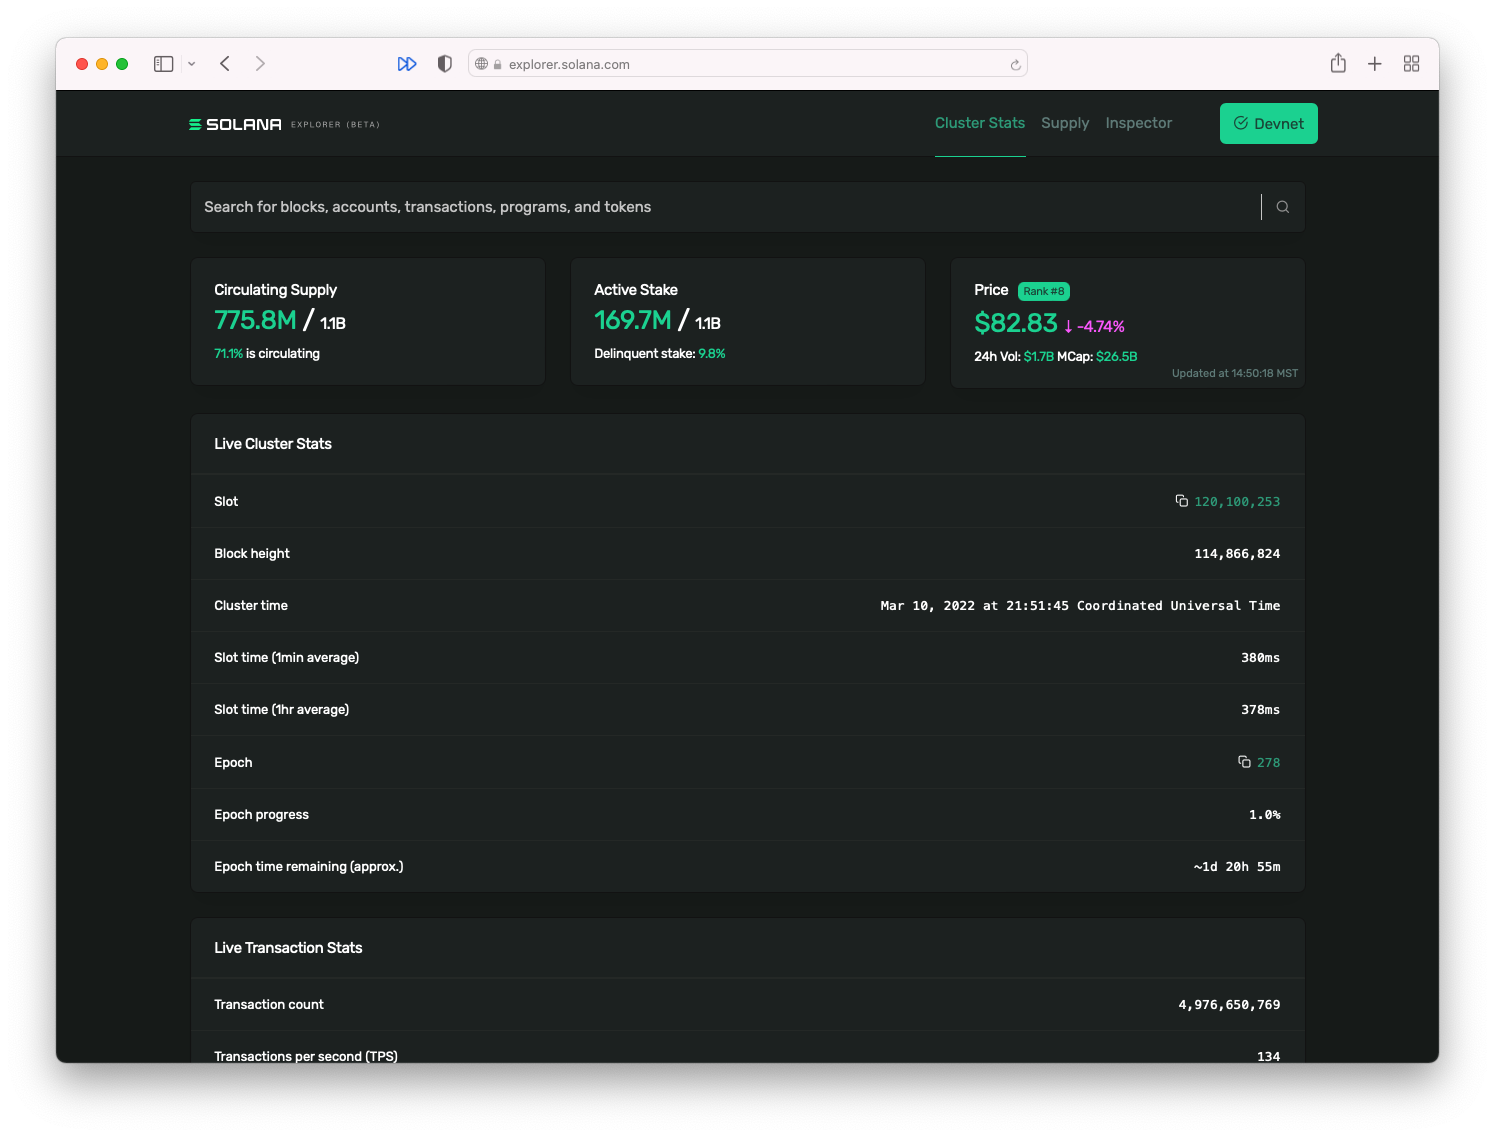
All transactions on the blockchain are publicly viewable on the Solana Explorer. For example, you could take the signature returned by sendAndConfirmTransaction() in the example above, search for that signature in the Solana Explorer, then see:
- when it occurred
- which block it was included in
- the transaction fee
- and more!
Demo
We’re going to create a script to ping a simple program that increments a counter each time it has been pinged. This program exists on the Solana Devnet at address ChT1B39WKLS8qUrkLvFDXMhEJ4F1XZzwUNHUt4AU9aVa. The program stores the count data in a specific account at the address Ah9K7dQ8EHaZqcAsgBW8w37yN2eAy3koFmUn4x3CJtod.
1. Basic scaffolding
Let’s start with some basic scaffolding. You’re welcome to set up your project however feels most appropriate, but we’ll be using a simple Typescript project with a dependency on the @solana/web3.js package. If you want to use our scaffolding, you can use the following commands in the command line:
1mkdir -p solana-ping-client/src && \ 2 cd solana-ping-client && \ 3 touch src/index.ts && \ 4 git init && touch .gitignore && \ 5 npm init -y && \ 6 npm install --save-dev typescript && \ 7 npm install --save-dev ts-node && \ 8 npx tsc --init && \ 9 npm install @solana/web3.js && \ 10 npm install dotenv && \ 11 touch .env
This will:
- create a new directory for the project with a subdirectory src
- move the command line prompt inside the project directory
- create an index.ts file inside of src
- initialize a git repository with a .gitignore file
- create a new npm package
- add a developer dependency on typescript
- add a developer dependency on ts-node
- create a .tsconfig file
- install the @solana/web3.js dependency
- install the .dotenv dependency
- create a .env file
If you want to match our code exactly, replace the contents of tsconfig.json with the following:
1{ 2 "compilerOptions": { 3 "target": "es5", 4 "module": "commonjs", 5 "strict": true, 6 "esModuleInterop": true, 7 "skipLibCheck": true, 8 "forceConsistentCasingInFileNames": true, 9 "outDir": "dist" 10 }, 11 "include": [ "./src/**/*" ] 12}
Add the following to the .gitignore:
1node_modules/ 2dist/ 3.env
And finally, add the following to the scripts object in package.json:
1"start": "ts-node src/index.ts"
2. Generate a new keypair
Before you can do anything, you’ll need a keypair. Let’s jump into the index.ts file and generate one:
1import web3 = require('@solana/web3.js') 2import Dotenv from 'dotenv' 3Dotenv.config() 4 5async function main() { 6 const newKeypair = web3.Keypair.generate() 7 console.log(newKeypair.secretKey.toString()) 8} 9 10main().then(() => { 11 console.log("Finished successfully") 12}).catch((error) => { 13 console.error(error) 14})
Most of this code is just boilerplate to run the file properly. The lines inside of the main() function generate a new keypair and log the secret key to the console.
Run npm start after saving this file and you should see an array of numbers printed to the console. This array represents the secret key for your new keypair. Do not use this keypair for Mainnet operations. Only use this keypair for testing.
Copy the secret key array from the console log and paste it into the .env file as an environment variable called, PRIVATE_KEY. This way we can reuse this keypair in future development instead of generating a new keypair every time we run something. It should look something like this but with different numbers:
1PRIVATE_KEY=[56,83,31,62,66,154,33,74,106,59,111,224,176,237,89,224,10,220,28,222,128,36,138,89,30,252,100,209,206,155,154,65,98,194,97,182,98,162,107,238,61,183,163,215,44,6,10,49,218,156,5,131,125,253,247,190,181,196,0,249,40,149,119,246]
3. Initialize Keypair from secret
Now that we’ve successfully generated a keypair and copied it to the .env file, we can remove the code inside of the main() function.
We’ll return to the main() function soon, but for now let’s create a new function outside of main() called initializeKeypair(). Inside of this new function:
- parse the PRIVATE_KEY environment variable as number[]
- use it to initialize a Uint8Array
- initialize and return a Keypair using that Uint8Array.
1function initializeKeypair(): web3.Keypair { 2 const secret = JSON.parse(process.env.PRIVATE_KEY ?? "") as number[] 3 const secretKey = Uint8Array.from(secret) 4 const keypairFromSecretKey = web3.Keypair.fromSecretKey(secretKey) 5 return keypairFromSecretKey 6}
4. Ping program
Now that we have a way of initializing our keypair, we need to establish a connection with Solana’s Devnet. In main(), let’s invoke initializeKeypair() and create a connection:
1async function main() { 2 const payer = initializeKeypair() 3 const connection = new web3.Connection(web3.clusterApiUrl('devnet')) 4}
Now create an async function outside of main() called pingProgram() with two parameters requiring a connection and a payer’s keypair as arguments:
1async function pingProgram(connection: web3.Connection, payer: web3.Keypair) { }
Inside this function, we need to:
- create a transaction
- create an instruction
- add the instruction to the transaction
- send the transaction.
Remember, the most challenging piece here is including the right information in the instruction. We know the address of the program that we are calling. We also know that the program writes data to a separate account whose address we also have. Let’s add the string versions of both of those as constants at the top of the index.ts file:
1const PROGRAM_ADDRESS = 'ChT1B39WKLS8qUrkLvFDXMhEJ4F1XZzwUNHUt4AU9aVa' 2const PROGRAM_DATA_ADDRESS = 'Ah9K7dQ8EHaZqcAsgBW8w37yN2eAy3koFmUn4x3CJtod'
Now, in the pingProgram() function, let’s create a new transaction, then initialize a PublicKey for the program account, and another for the data account.
1async function pingProgram(connection: web3.Connection, payer: web3.Keypair) { 2 const transaction = new web3.Transaction() 3 4 const programId = new web3.PublicKey(PROGRAM_ADDRESS) 5 const programDataPubkey = new web3.PublicKey(PROGRAM_DATA_ADDRESS) 6}
Next, let’s create the instruction. Remember, the instruction needs to include the public key for the program and it also needs to include an array with all the accounts that will be read from or written to. In this example program, only the data account referenced above is needed.
1async function pingProgram(connection: web3.Connection, payer: web3.Keypair) { 2 const transaction = new web3.Transaction() 3 4 const programId = new web3.PublicKey(PROGRAM_ADDRESS) 5 const programDataPubkey = new web3.PublicKey(PROGRAM_DATA_ADDRESS) 6 7 const instruction = new web3.TransactionInstruction({ 8 keys: [ 9 { 10 pubkey: programDataPubkey, 11 isSigner: false, 12 isWritable: true 13 }, 14 ], 15 programId 16 }) 17}
Next, let’s add the instruction to the transaction we created at the start of the function. Then, call upon sendAndConfirmTransaction() by passing in the connection, transaction, and payer. Finally, let’s log the result of that function call so we can look it up on the Solana Explorer.
1async function pingProgram(connection: web3.Connection, payer: web3.Keypair) { 2 const transaction = new web3.Transaction() 3 4 const programId = new web3.PublicKey(PROGRAM_ADDRESS) 5 const programDataPubkey = new web3.PublicKey(PROGRAM_DATA_ADDRESS) 6 7 const instruction = new web3.TransactionInstruction({ 8 keys: [ 9 { 10 pubkey: programDataPubkey, 11 isSigner: false, 12 isWritable: true 13 }, 14 ], 15 programId 16 }) 17 18 transaction.add(instruction) 19 20 const signature = await web3.sendAndConfirmTransaction( 21 connection, 22 transaction, 23 [payer] 24 ) 25 26 console.log(signature) 27}
Finally, let's invoke pingProgram() within main() using connection and payer:
1async function main() { 2 const payer = initializeKeypair() 3 const connection = new web3.Connection(web3.clusterApiUrl('devnet')) 4 await pingProgram(connection, payer) 5}
5. Airdrop
Now run the code with npm start and see if it works. You may end up with the following error in the console:
Transaction simulation failed: Attempt to debit an account but found no record of a prior credit.
If you get this error, it’s because your keypair is brand new and doesn’t have any SOL to cover the transaction fees. Let’s fix this by adding the following line in main() before the call to pingProgram():
1await connection.requestAirdrop(payer.publicKey, web3.LAMPORTS_PER_SOL*1)
This will deposit 1 SOL into your account which you can use for testing. This won’t work on Mainnet where it would actually have value. But it's incredibly convenient for testing locally and on Devnet.
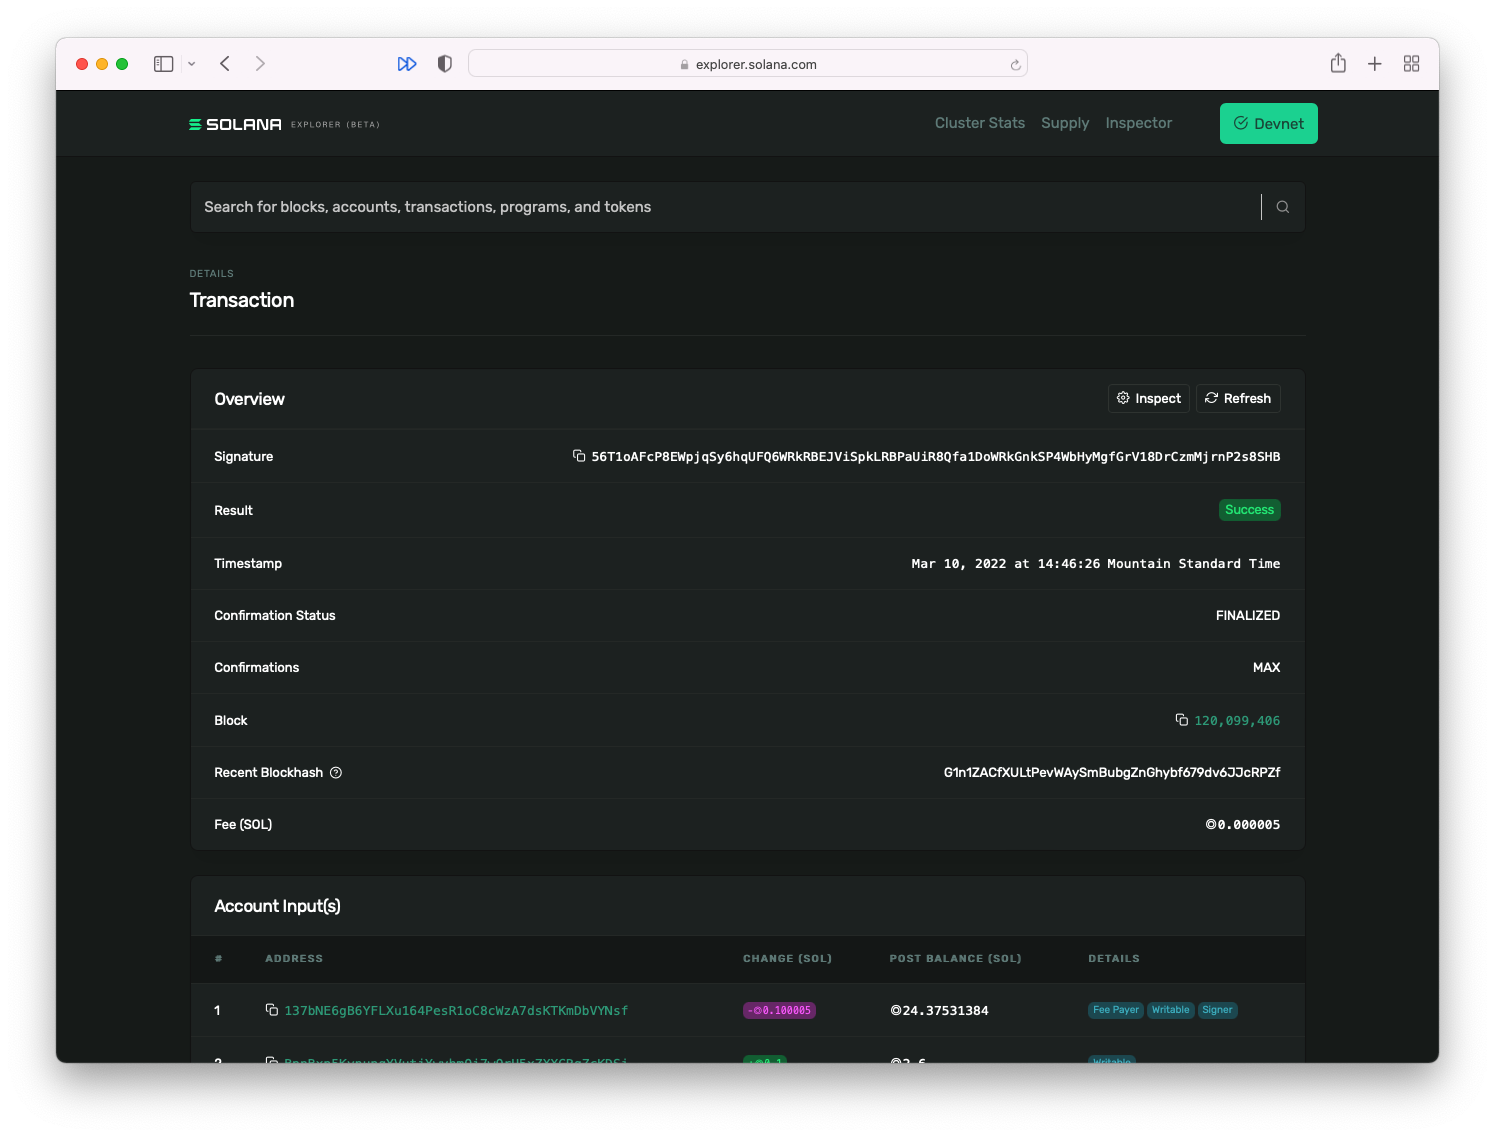
6. Check the Solana explorer
Now run the code again. It may take a moment or two, but now the code should work and you should see a long string printed to the console, like the following:
155S47uwMJprFMLhRSewkoUuzUs5V6BpNfRx21MpngRUQG3AswCzCSxvQmS3WEPWDJM7bhHm3bYBrqRshj672cUSG
Copy this confirmation signature. Open a browser and go to https://explorer.solana.com/?cluster=devnet (the query parameter at the end of the URL will ensure that you’ll explore transactions on Devnet instead of Mainnet). Paste the signature into the search bar at the top of Solana’s Devnet explorer and hit enter. You should see all the details about the transaction. If you scroll all the way to the bottom, then you will see Program Logs, which show how many times the program has been pinged including your ping.

If you want to make it easier to look at Solana Explorer for transactions in the future, simply change your console.log in pingProgram() to the following:
1console.log(`You can view your transaction on the Solana Explorer at:\nhttps://explorer.solana.com/tx/${sig}?cluster=devnet`)
And just like that you’re calling programs on the Solana network and writing data to chain!
In the next few lessons you’ll learn how to
- do this safely from the browser instead of from running a script
- add custom data to your instructions
- deserialize data from the chain
Challenge
Go ahead and create a script from scratch that will allow you to transfer SOL from one account to another on Devnet. Be sure to print out the transaction signature so you can look at it on the Solana Explorer.
If you get stuck feel free to glance at the solution code.