Hello World
Lesson Objectives
By the end of this lesson, you will be able to:
- Use the Rust module system
- Define a function in Rust
- Explain the Result type
- Explain the entry point to a Solana program
- Build and deploy a basic Solana program
- Submit a transaction to invoke our “Hello, world!” program
TL;DR
- Programs on Solana are a particular type of account that stores and executes instruction logic
- Solana programs have a single entry point to process instructions
- A program processes an instruction using the program_id, list of accounts, and instruction_data included with the instruction
Overview
Solana's ability to run arbitrary executable code is part of what makes it so powerful. Solana programs, similar to "smart contracts" in other blockchain environments, are quite literally the backbone of the Solana ecosystem. And the collection of programs grows daily as developers and creators dream up and deploy new programs.
This lesson will give you a basic introduction to writing and deploying a Solana program using the Rust programming language. To avoid the distraction of setting up a local development environment, we'll be using a browser-based IDE called Solana Playground.
Rust Basics
Before we dive into the building our "Hello, world!" program, let’s first go over some Rust basics. If you want to dig deeper into Rust, have a look at the Rust language book.
Module System
Rust organizes code using what is collectively referred to as the “module system”.
This includes:
- Modules - A module separates code into logical units to provide isolated namespaces for organization, scope, and privacy of paths
- Crates - A crate is either a library or an executable program. The source code for a crate is usually subdivided into multiple modules.
- Packages - A package contains a collection of crates as well as a manifest file for specifying metadata and dependencies between packages
Throughout this lesson, we’ll focus on using crates and modules.
Paths and scope
Crates in Rust contain modules that define functionality which can be shared with multiple projects. If we want to access an item within a module, then we need to know its "path" (like when we're navigating a filesystem).
Think of the crate structure as a tree where the crate is the base and modules are branches, each of which can have submodules or items that are additional branches.
The path to a particular module or item is the name of each step from the crate to that module where each is separated by ::. As an example, let's look at the following structure:
- The base crate is solana_program
- solana_program contains a module named account_info
- account_info contains a struct named AccountInfo
The path to AccountInfo would be solana_program::account_info::AccountInfo.
Absent of any other keywords, we would need to reference this entire path to use AccountInfo in our code.
However, with the use keyword we can bring an item into scope so that it can be reused throughout a file without specifying the full path each time. It's common to see a series of use commands at the top of a Rust file.
1use solana_program::account_info::AccountInfo
Declaring Functions in Rust
We define a function in Rust by using the fn keyword followed by a function name and a set of parentheses.
1fn process_instruction()
We can then add arguments to our function by including variable names and specifying its corresponding data type within the parentheses.
Rust is known as a ”statically typed” language and every value in Rust is of a certain ”data type”. This meaning that Rust must know the types of all variables at compile time. In cases when multiple types are possible, we must add a type annotation to our variables.
In the example below, we create a function named process_instruction that requires the following arguments:
- program_id - required to be type &Pubkey
- accounts - required to be type &[AccountInfo]
- instruction_data - required to be type &[u8]
Note the & in front of the type for each argument listed in the process_instruction function. In Rust, & represents a ”reference” to another variable. This allows you to refer to some value without taking ownership of it. The “reference” is guaranteed to point to a valid value of a particular type. The action of creating a reference in Rust is called “borrowing”.
In this example, when the process_instruction function is called, a user must pass in values for the required arguments. The process_instruction function then references the values passed in by the user, and guarantees that each value is the correct data type specified in the process_instruction function.
Additionally, note the brackets [] around &[AccountInfo] and &[u8]. This means that the accounts and instruction_data arguments expect “slices” of types AccountInfo and u8, respectively. A “slice” is similar to an array (collection of objects of the same type), except the length is not known at compile time. In other words, the accounts and instruction_data arguments expect inputs of unknown length.
1fn process_instruction( 2 program_id: &Pubkey, 3 accounts: &[AccountInfo], 4 instruction_data: &[u8], 5)
We can then have our functions return values by declaring the return type using an arrow -> after the function.
In the example below, the process_instruction function will now return a value of type ProgramResult. We will go over this in the next section.
1fn process_instruction( 2 program_id: &Pubkey, 3 accounts: &[AccountInfo], 4 instruction_data: &[u8], 5) -> ProgramResult
Result enum
Result is a standard library type that represents two discrete outcomes: success (Ok) or failure (Err). We'll talk more about enums in a future lesson, but you'll see Ok used later in this lesson so it's important to cover the basics.
When you use Ok or Err, you must include a value, the type of which is determined by the context of the code. For example, a function that requires a return value of type Result<String, i64> is saying that the function can either return Ok with an embedded string value or Err with an embedded integer. In this example, the integer is an error code that can be used to appropriately handle the error.
To return a success case with a string value, you would do the following:
1Ok(String::from("Success!"));
To return an error with an integer, you would do the following:
1Err(404);
Solana Programs
Recall that all data stored on the Solana network are contained in what are referred to as accounts. Each account has its own unique address which is used to identify and access the account data. Solana programs are just a particular type of Solana account that store and execute instructions.
Solana Program Crate
To write Solana programs with Rust, we use the solana_program library crate. The solana_program crate acts as a standard library for Solana programs. This standard library contains the modules and macros that we'll use to develop our Solana programs. If you want to dig deeper solana_program crate, have a look here.
For a basic program we will need to bring into scope the following items from the solana_program crate:
1use solana_program::{ 2 account_info::AccountInfo, 3 entrypoint, 4 entrypoint::ProgramResult, 5 pubkey::Pubkey, 6 msg 7};
- AccountInfo - a struct within the account_info module that allows us to access account information
- entrypoint - a macro that declares the entry point of the program
- ProgramResult - a type within the entrypoint module that returns either a Result or ProgramError
- Pubkey - a struct within the pubkey module that allows us to access addresses as a public key
- msg - a macro that allows us to print messages to the program log
Solana Program Entry Point
Solana programs require a single entry point to process program instructions. The entry point is declared using the entrypoint! macro.
The entry point to a Solana program requires a process_instruction function with the following arguments:
- program_id - the address of the account where the program is stored
- accounts - the list of accounts required to process the instruction
- instruction_data - the serialized, instruction-specific data
1entrypoint!(process_instruction); 2 3fn process_instruction( 4 program_id: &Pubkey, 5 accounts: &[AccountInfo], 6 instruction_data: &[u8], 7) -> ProgramResult;
Recall that Solana program accounts only store the logic to process instructions. This means program accounts are "read-only" and “stateless”. The “state” (the set of data) that a program requires in order to process an instruction is stored in data accounts (separate from the program account).
In order to process an instruction, the data accounts that an instruction requires must be explicitly passed into the program through the accounts argument. Any additional inputs must be passed in through the instruction_data argument.
Following program execution, the program must return a value of type ProgramResult. This type is a Result where the embedded value of a success case is () and the embedded value of a failure case is ProgramError. () is effectively an empty value and ProgramError is an error type defined in the solana_program crate.
...and there you have it - you now know all the things you need for the foundations of creating a Solana program using Rust. Let’s practice what we’ve learned so far!
Demo
We're going to build a "Hello, World!" program using Solana Playground. Solana Playground is a tool that allows you to write and deploy Solana programs from the browser.
1. Setup
Click here to open Solana Playground. Next, go ahead and delete everything in the default lib.rs file and create a Playground wallet.
2. Solana Program Crate
First, let's bring into scope everything we’ll need from the solana_program crate.
1use solana_program::{ 2 account_info::AccountInfo, 3 entrypoint, 4 entrypoint::ProgramResult, 5 pubkey::Pubkey, 6 msg 7};
Next, let's set up the entry point to our program using the entrypoint! macro and create the process_instruction function. The msg! macro then allows us to print “Hello, world!” to the program log when the program is invoked.
3. Entry Point
1entrypoint!(process_instruction); 2 3pub fn process_instruction( 4 program_id: &Pubkey, 5 accounts: &[AccountInfo], 6 instruction_data: &[u8] 7) -> ProgramResult{ 8 msg!("Hello, world!"); 9 10 Ok(()) 11}
All together, the “Hello, world!” program will look like this:
1use solana_program::{ 2 account_info::AccountInfo, 3 entrypoint, 4 entrypoint::ProgramResult, 5 pubkey::Pubkey, 6 msg 7}; 8 9entrypoint!(process_instruction); 10 11pub fn process_instruction( 12 program_id: &Pubkey, 13 accounts: &[AccountInfo], 14 instruction_data: &[u8] 15) -> ProgramResult{ 16 msg!("Hello, world!"); 17 18 Ok(()) 19}
4. Build and Deploy
Now let's build and deploy our program using Solana Playground.

5. Invoke Program
Finally, let's invoke our program from the client side. Download the code here.
The focus of this lesson is to build our Solana program, so we’ve gone ahead and provided the client code to invoke our “Hello, world!” program. The code provided includes a sayHello helper function that builds and submits our transaction. We then call sayHello in the main function and print a Solana Explorer URL to view our transaction details in the browser.
Open the index.ts file you should see a variable named programId. Go ahead and update this with the program ID of the “Hello, world!" program you just deployed using Solana Playground.
1let programId = new web3.PublicKey("<YOUR_PROGRAM_ID>");
You can locate the program ID on Solana Playground referencing the image below.
Next, install the Node modules with npm i.
Now, go ahead and run npm start. This command will:
- Generate a new keypair and create a .env file if one does not already exist
- Airdrop devnet SOL
- Invoke the “Hello, world!” program
- Output the transaction URL to view on Solana Explorer
Copy the transaction URL printed in the console into your browser. Scroll down to see “Hello, world!” under Program Instruction Logs.
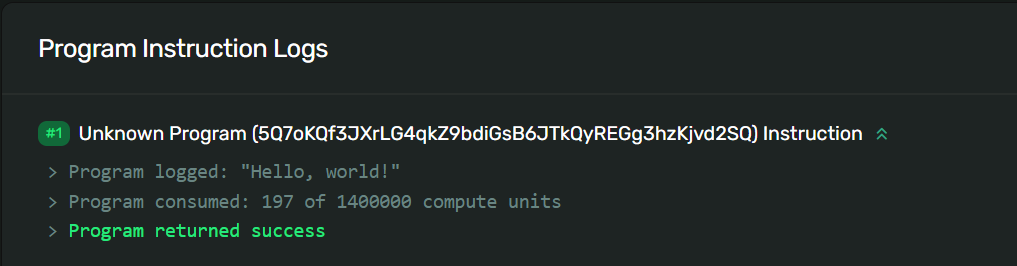
Congratulations, you’ve just successfully built and deployed a Solana program!
Challenge
Now it’s your turn to build something independently. Because we're starting with very simple programs, yours will look almost identical to what we just created. It's useful to try and get to the point where you can write it from scratch without referencing prior code, so try not to copy and paste here.
- Write a new program that uses the msg! macro to print your own message to the program log.
- Build and deploy your program like we did in the demo.
- Invoke your newly deployed program and use Solana Explorer to check that your message was printed in the program log.
As always, get creative with these challenges and take them beyond the basic instructions if you want - and have fun!